 Snapmap
Guide to Snapmap+
What is Snapmap+
Snapmap+ is a tool that reads and writes a DOOM (2016) SnapMap file directly, instead of going through the game’s built-in editor UI. That gives you three things the stock editor can’t:
- Properties the Properties menu doesn’t expose. Every entity in DOOM’s engine has far more fields than SnapMap’s UI shows you — Snapmap+ lets you read and write all of them.
- No editor guardrails. Name length limits, size limits, and the fixed lists of textures/models/ effects the Properties menu picks from aren’t rules the engine enforces — they’re just what the stock editor’s UI happens to offer. Because Snapmap+ writes the map file directly instead of going through that UI, none of those limits apply: you can scale something past the normal max size, or set a texture that isn’t in SnapMap’s own picker at all.
- Entities SnapMap was never built to place. The DOOM engine contains far more object types than SnapMap’s palette exposes. Snapmap+ can place and configure any of them.
Edits that use stock engine behavior and installed assets can travel with the map file itself, including to console players. Features that supply new runtime resources have additional requirements: resized Grid Rooms require Snapmap+ on the player’s PC and cannot be delivered to vanilla or console players.
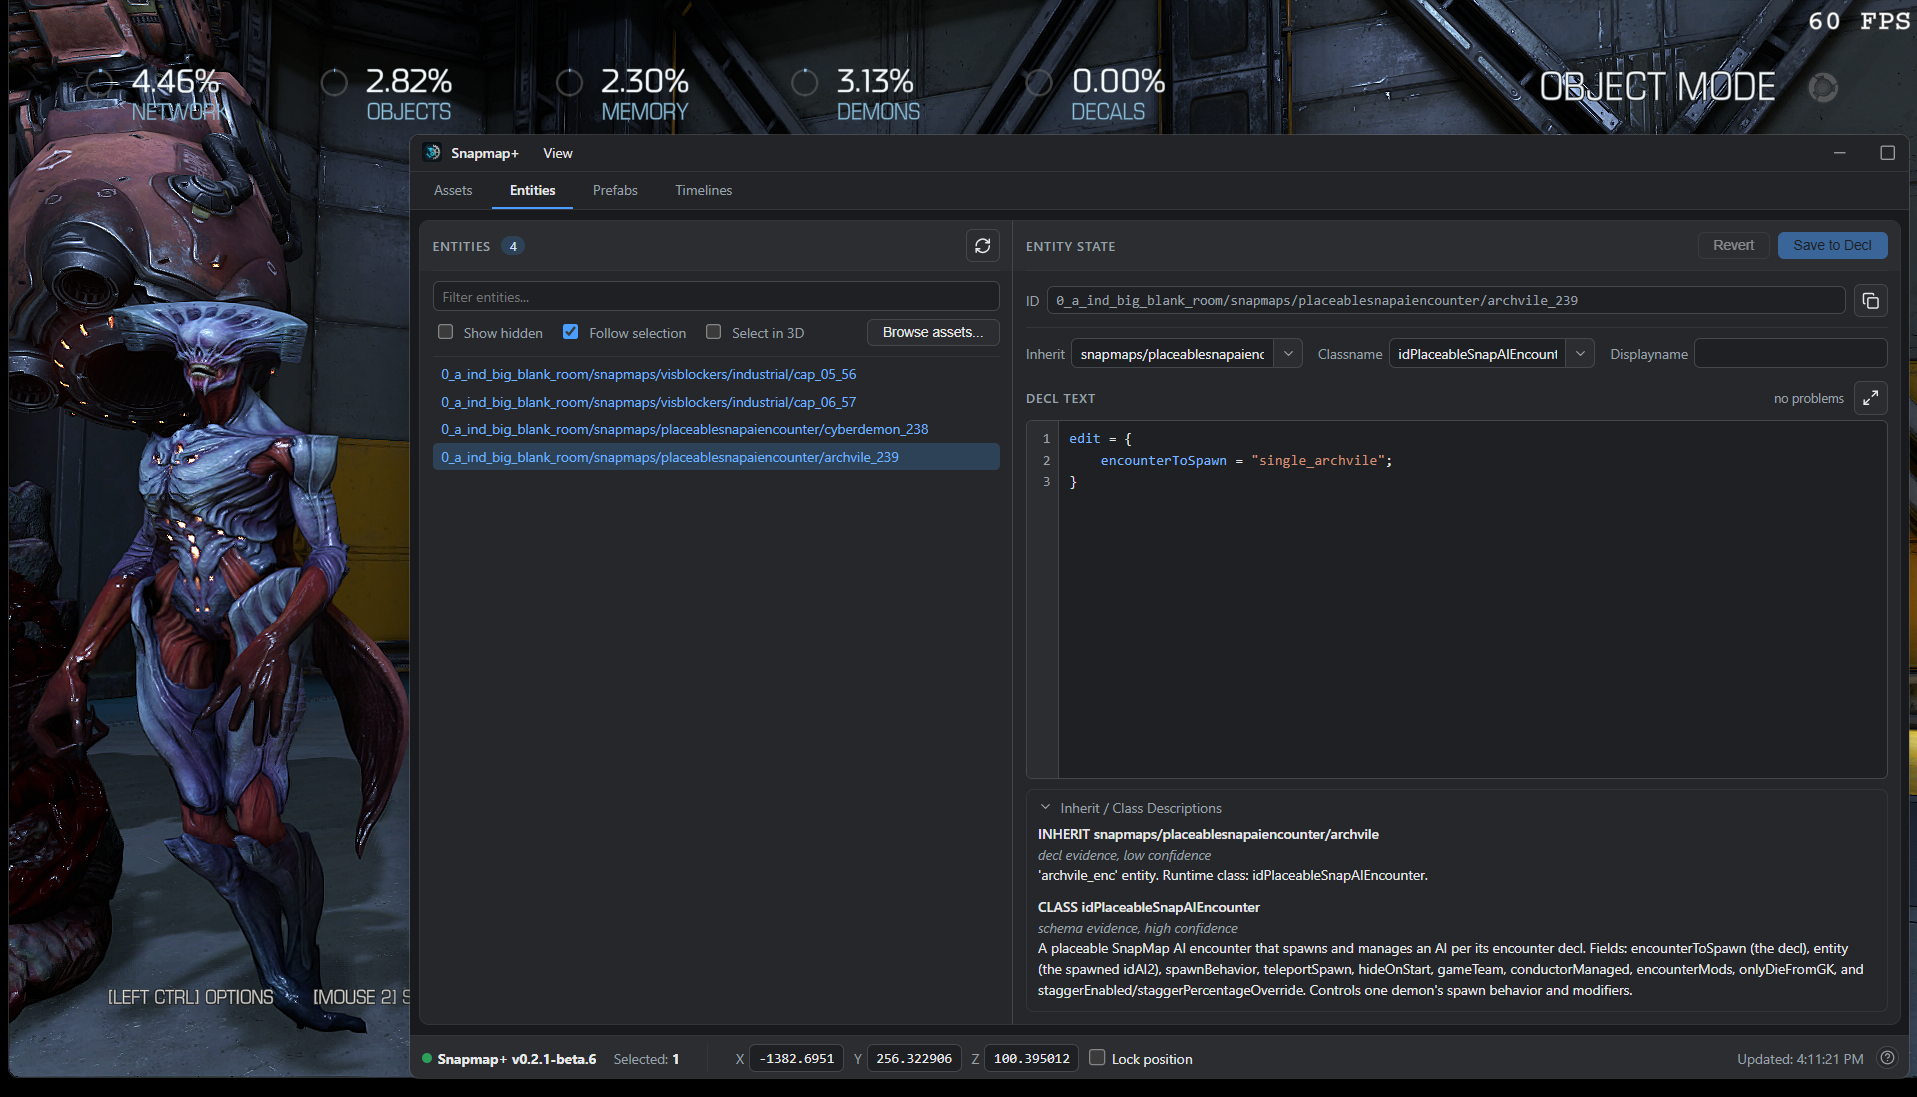
Resizing Grid Rooms
Highlight a classic or modern Grid Room in DOOM’s editor and press X to open Module Properties. Change Grid Room Size X, Y and Z. This works in Blueprint mode and keeps the Blueprint camera. Left Ctrl opens the action menu; the size controls are in DOOM itself.
Each room keeps its own dimensions. Doors and frames stay their original size, and built-in room lights follow the resized room with adjusted coverage. Objects you placed keep their module-local positions and sizes, so inspect objects near the walls after shrinking. Connected branches move to retain their doorways; conflicting connection loops and new overlaps can prevent an edit.
| Grid Room | Original X / Y / Z | Minimum X / Y / Z |
|---|---|---|
| Classic | 2560 / 2560 / 2048 | 416 / 416 / 304 |
| Modern | 5120 / 5120 / 3392 | 864 / 272 / 432 |
Out-of-range values clamp and the panel shows the applied dimensions. The maximum
follows the current snapEdit_environmentModuleBounds cvar, the room’s world
position and its connected neighbors. Raising that cvar allows larger rooms
without restarting, up to native collision and navigation coordinate limits.
Snapmap+ does not change the cvar for you. The current process retains up to
64 distinct size/type combinations; restart DOOM if that cache fills.
Keep the world cvar large enough when reopening or playing a map authored with
a raised limit; the room dimensions are saved, but this cvar is not stored in
the map. For example, snapEdit_environmentModuleBounds 30000 permits a larger
world box, while each room still has to fit at its actual position.
Save and load normally. Collision, navigation and marked blocking-volume navigation use the resized room. Players need Snapmap+ to load these maps. The resizing feature is included in the existing backend DLL; it needs no separate override package or map sidecar file.
To return a map to vanilla compatibility, restore every Grid Room to its original dimensions, restore View Distance to 8192 (or zero) and Fog Strength to zero, and remove any objects or logic that require packages. Save again. Removing the last use of a package removes that map’s embedded dependency; it keeps your installed package available for other maps. Other mod-only content must also be removed.
The faint green surface grid appears when placing or moving objects that use the game’s navigation placement display, such as demons. Its brightness pulses, so it can become very faint while still enabled. It follows the room’s native display surfaces, rather than covering every wall or appearing for every prop or logic object. Snap to Grid moves the held object to the editing grid; it does not toggle this display. The custom blocking-volume navigation preview is a separate overlay.
Map view distance and fog
Open Settings > Properties in DOOM’s SnapMap editor and scroll to Map Rendering. All seven settings are always available for editing. Choose Apply, then save your map normally. Cancel discards unapplied changes. The values are stored inside this map and work with both OpenGL and Vulkan. Loading another map uses that map’s own settings.
View Distance at 8192 (default) or zero uses each module’s original view distance. Other values apply a distance override automatically. Fog Strength at zero uses each module’s original fog; positive values apply the fog range and color below. Distance and fog operate independently. Returning these settings to their defaults restores the original environments automatically, even if unused fog colors or ranges remain edited. There is no separate enable or vanilla-compatibility switch. Players need Snapmap+ for custom values to take effect.
| Setting | Default value | Range |
|---|---|---|
| View Distance | 8192 (original environment) | 0, or 256 to 200000 game units |
| Fog Strength | 0 (original environment) | 0 to 100 |
| Fog Start | 1500 | 0 to 199999 game units |
| Fog End | 6500 | 1 to 200000 game units |
| Fog Red / Green / Blue | 0.35 / 0.40 / 0.45 | 0 to 1 each |
An extended view distance such as 60000 removes the nearby black cutoff in large Grid Rooms. Raising Fog Strength blends distant geometry into the selected color. Fog End always stays beyond Fog Start.
For a shorter rendering range, lower View Distance and tune fog to conceal the cutoff before that distance. Fog alone does not reduce the geometry being drawn; the view distance controls that tradeoff. Check the result from several positions in Play mode, especially in large open rooms.
Earlier saved custom values are read automatically. Maps saved with the former enable switch off load with native defaults instead of activating unused values. Zero Fog Strength now restores native fog, including a module’s built-in fog.
Installing Snapmap+
Get the pre-patch DOOM files
Snapmap+ currently targets the DOOM build from before the April 2024 patch — the patch changed enough of the engine’s internals that Snapmap+ needs to be rebuilt against it, and that work is ongoing separately. Until then, you’ll need to run DOOM on the previous Steam depot:
- Press Windows Key + R, then enter
steam://nav/consoleto open the Steam console. - In the Steam console, run:
download_depot 379720 379721 2206249600939156631 - Once it finishes, find the downloaded files under your Steam folder, typically:
C:\Program Files (x86)\Steam\steamapps\content\app_379720\depot_379721 - Copy those files into your DOOM install folder (e.g.
C:\Program Files (x86)\Steam\steamapps\common\DOOM), replacing everything when prompted.
Online services (playing and publishing maps) still work on this depot. Multiplayer/Coop matchmaking with other players does not while you’re on it.
Running “Verify integrity of game files” in Steam will silently pull you back to the current (patched) build — if that happens, and you still have the Snapmap+ files installed, remove them first (see below), verify, then redo the depot-download steps above when you want to go back to editing.
Install Snapmap+ itself
Download snapmap-plus.exe from the Snapmap+ site (or from the project’s GitHub Releases page)
and double-click it. It finds your DOOM 2016 install automatically by looking through your Steam
libraries, asks you to confirm, and places the overlay. That’s the whole install. (In the in-game
console, Snapmap+’s commands and cvars all carry the short sh_ prefix — sh_help lists them.)
A few practical notes:
- Close DOOM first. A running game locks the files — the installer detects this and asks you to close it rather than failing cryptically.
- If auto-detection can’t find DOOM (a non-Steam copy, say), run it from a terminal instead and point
it at the folder:
snapmap-plus install --doom "C:\path\to\DOOM". - While Snapmap+ is in beta, the installer says “No stable release has been published yet” and installs the newest beta automatically — nothing extra to do.
- Already installed? Double-clicking
snapmap-plus.exeagain shows your installed version, tells you when a newer one is available (press Enter to update), and takes any command —update,changelog,uninstall,status— right there, no terminal needed. - Updating later: run
snapmap-plus update— it updates both the overlay andsnapmap-plus.exeitself. You never need to re-download anything from the site. - Coming from the original SnapHak? If your DOOM folder still has the original (closed-source)
SnapHak in it, the installer notices, tells you, and removes its files as part of the install —
Snapmap+ fully replaces it, so nothing of the old tool needs to stay behind. Your maps, prefabs and
overrides carry straight over: anything in the old
%USERPROFILE%\snaphakfolder is copied into Snapmap+’s own data folder (%LOCALAPPDATA%\snapmap-plus), and the old folder itself is never touched. - Packages from an earlier release? Install and update convert them to the current package format first, keeping the originals; see Packages from earlier Snapmap+ releases.
- Uninstalling:
snapmap-plus uninstallrestores your DOOM folder to exactly what it was before. Your own Snapmap+ data (config.json, prefabs, rawmaps, overrides under%LOCALAPPDATA%\snapmap-plus) is left untouched. snapmap-plus helpin a terminal lists everything else:status,changelog,version.
What actually lands in your DOOM folder is small: XINPUT1_3.dll in the folder itself, and
snapmap-plus-ui.dll inside a snapmap-plus\ subfolder. Everything is hash-verified before a single
file is touched, and the installer keeps a record so uninstall reverses exactly what it placed. Your
settings are separate: Snapmap+ creates %LOCALAPPDATA%\snapmap-plus\config.json the first time it
starts, rather than shipping one in the installer.
Opening Snapmap+
Either renderer works — you don’t have to pick one. DOOM 2016 ships two executables built from the
same source, DOOMx64vk.exe (Vulkan) and DOOMx64.exe (OpenGL), and switches between them by relaunching
itself, so one Steam launch can land you in either. Snapmap+ installs once and loads into whichever
executable is actually running. Nothing to configure.
The renderer lives in the r_renderAPI cvar (0 is OpenGL, 1 is Vulkan), stored in
%USERPROFILE%\Saved Games\id Software\DOOM\base\DOOMConfig.local. Changing it is what makes DOOM restart
into the other executable — useful to know if you’re chasing a graphics problem, but not something Snapmap+
asks you to touch. OpenGL support is new: it is proven against the shipped OpenGL executable in our tests,
so if you see Snapmap+ behave differently there than under Vulkan, that’s worth reporting.
Once installed, open a SnapMap in editor mode. A second window — the Snapmap+ panel — will appear alongside the DOOM window; you’ll need to switch windows (Alt+Tab) to see it, since it doesn’t overlay the game.
Set DOOM’s display mode to Windowed or Borderless while you’re editing with Snapmap+ — avoid true Fullscreen. Snapmap+’s panel is a separate OS window, and switching away from a truly-fullscreen DOOM window to look at it can crash the game. Borderless and Windowed don’t have that problem.
The window
Snapmap+’s panel has four tabs — Assets, Entities, Prefabs, and Timelines — and a couple of controls that stay visible no matter which tab you’re on:
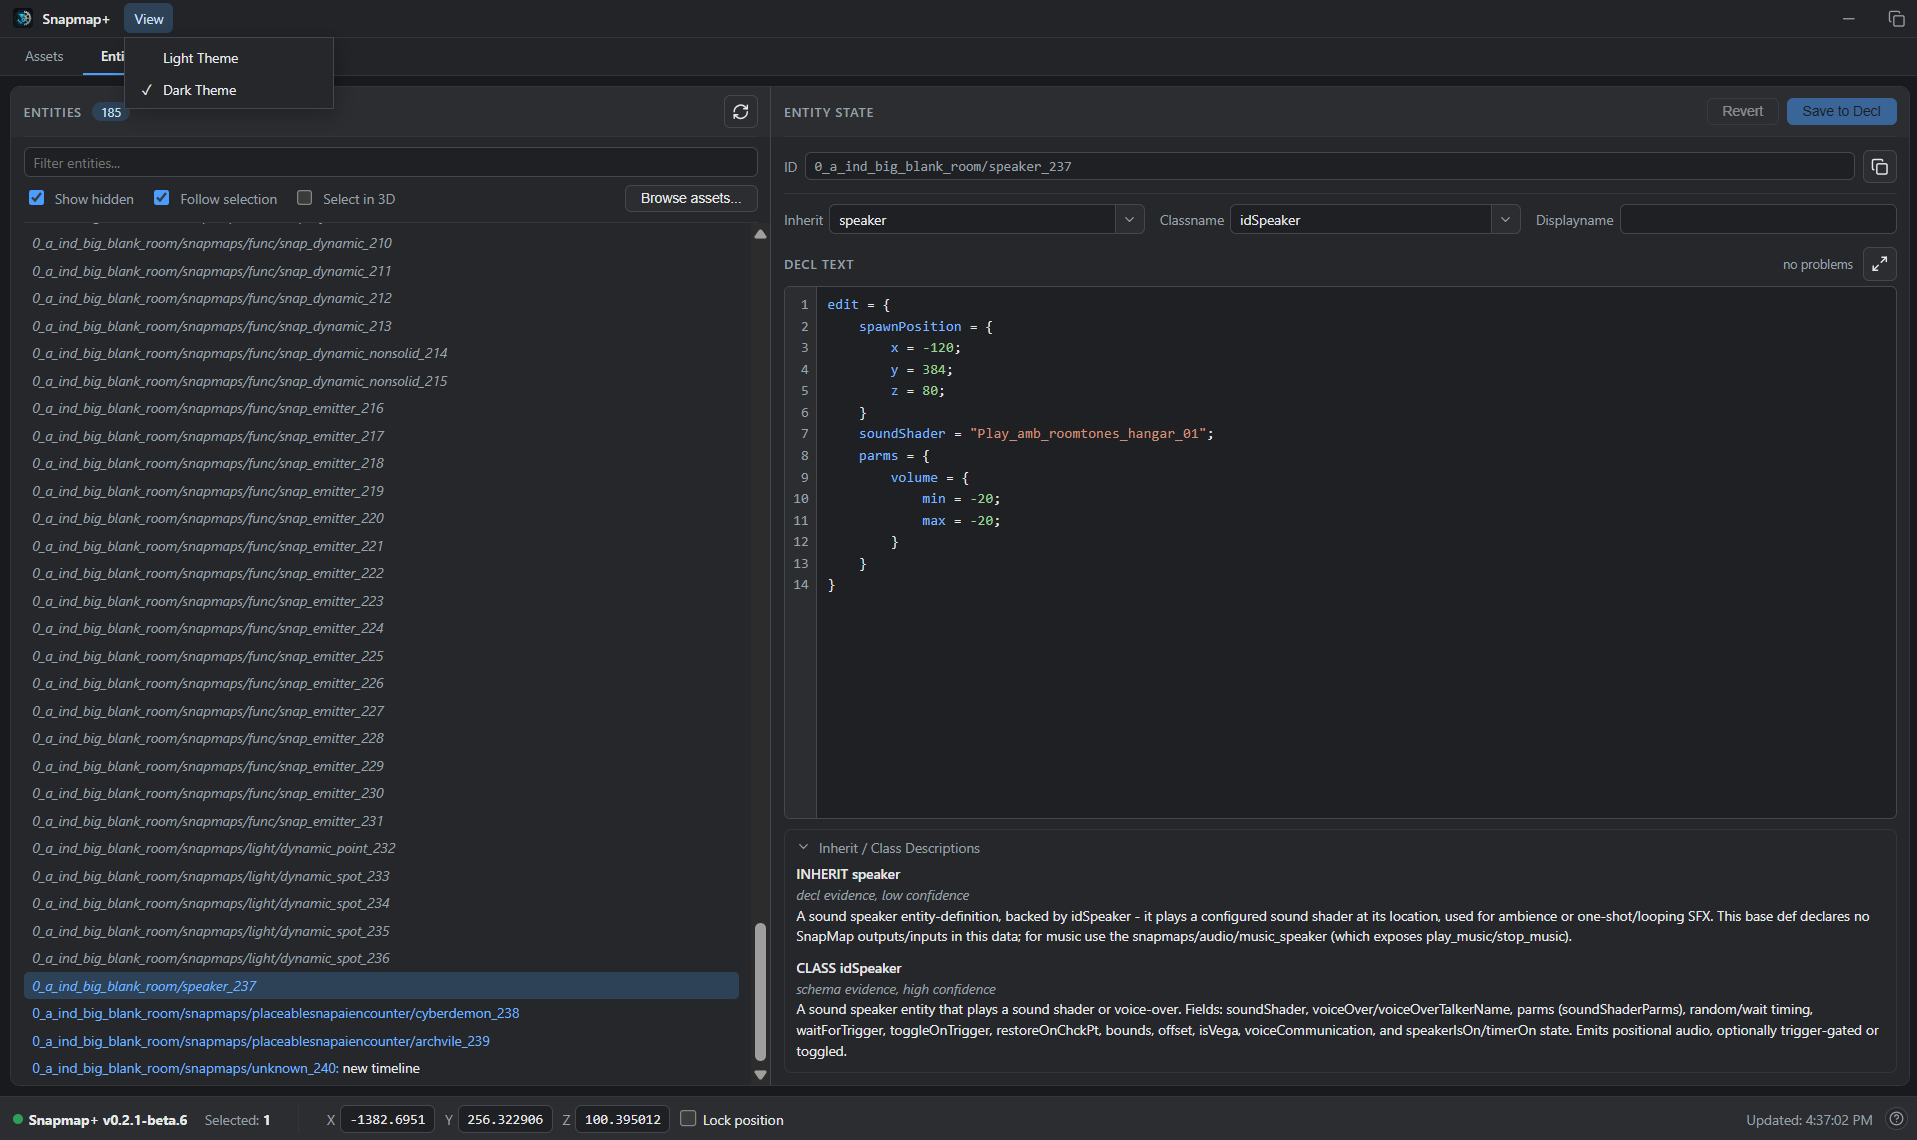
View → Light Theme / Dark Theme switches the panel’s whole color scheme. It doesn’t follow your system theme automatically — pick whichever you prefer. Snapmap+ remembers the choice and applies it before the window first appears on later launches, so a saved dark theme does not flash light while loading.
config.json is safe to leave alone. If you deliberately delete it, Snapmap+ treats that as Reset
preferences and recreates the default light setting, Show Hidden off, Entity selection mode off, and user
overrides enabled on the next startup. If the file is damaged, Snapmap+ keeps a timestamped .corrupt.json
backup, restores defaults, and tells you once. If it cannot save a window setting, that setting still works
for the current session and the window explains that it was not remembered. sh_user_overrides is different:
a failed console write reports the failure, leaves this launch unchanged, and does not establish a change for
the next launch. Updates, uninstall, and reinstall preserve the file.
The status bar along the bottom stays visible on every tab too:

- The green dot plus version string on the left confirms Snapmap+ is connected and tells you which build you’re running.
- Selected shows how many entities are currently selected.
- X / Y / Z is your editor camera’s live position, and updates continuously while you move around — handy for finding coordinates to paste into a property. Check Lock position to pin the fields (and the camera) in place instead of tracking your movement live; editing a locked field’s value moves the camera there.
- Updated (far right) is a live timestamp of the last change Snapmap+ picked up from the map.
- The ? icon next to it opens the feedback dialog — see Reporting Bugs and Requesting Features.
The Entities Tab
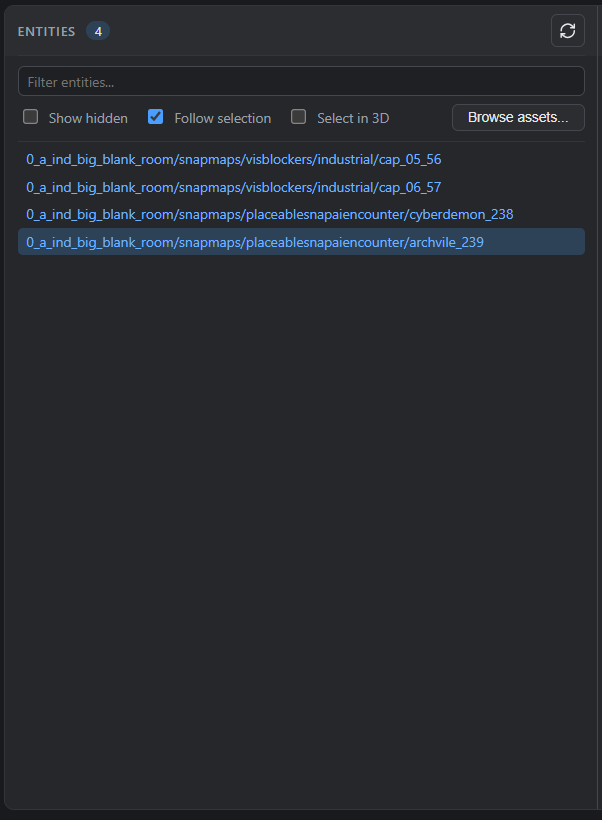
The Entities tab lists every entity placed in your map, by its reference ID and, if you’ve given it one, its display name. The list keeps itself up to date automatically as you edit — Refresh is there if you ever want to force an immediate re-sync yourself.
- Filter entities… narrows the list by typing part of an ID or name.
- Show hidden reveals the entities that exist in every map by default (the built-in filters like “any player” / “any AI”, etc.) — left unchecked, those are hidden so the list stays focused on what you actually placed. Snapmap+ remembers the choice.
- Follow selection makes the list track whatever you have selected in the SnapMap 3D editor — select something in-game, and its row (and the Entity State panel) update to match. Turn it off if you’d rather browse the list independently of what’s selected in-game.
- Select in 3D — the reverse direction: selecting a row (or rows) here also selects the matching entity in the SnapMap 3D editor.
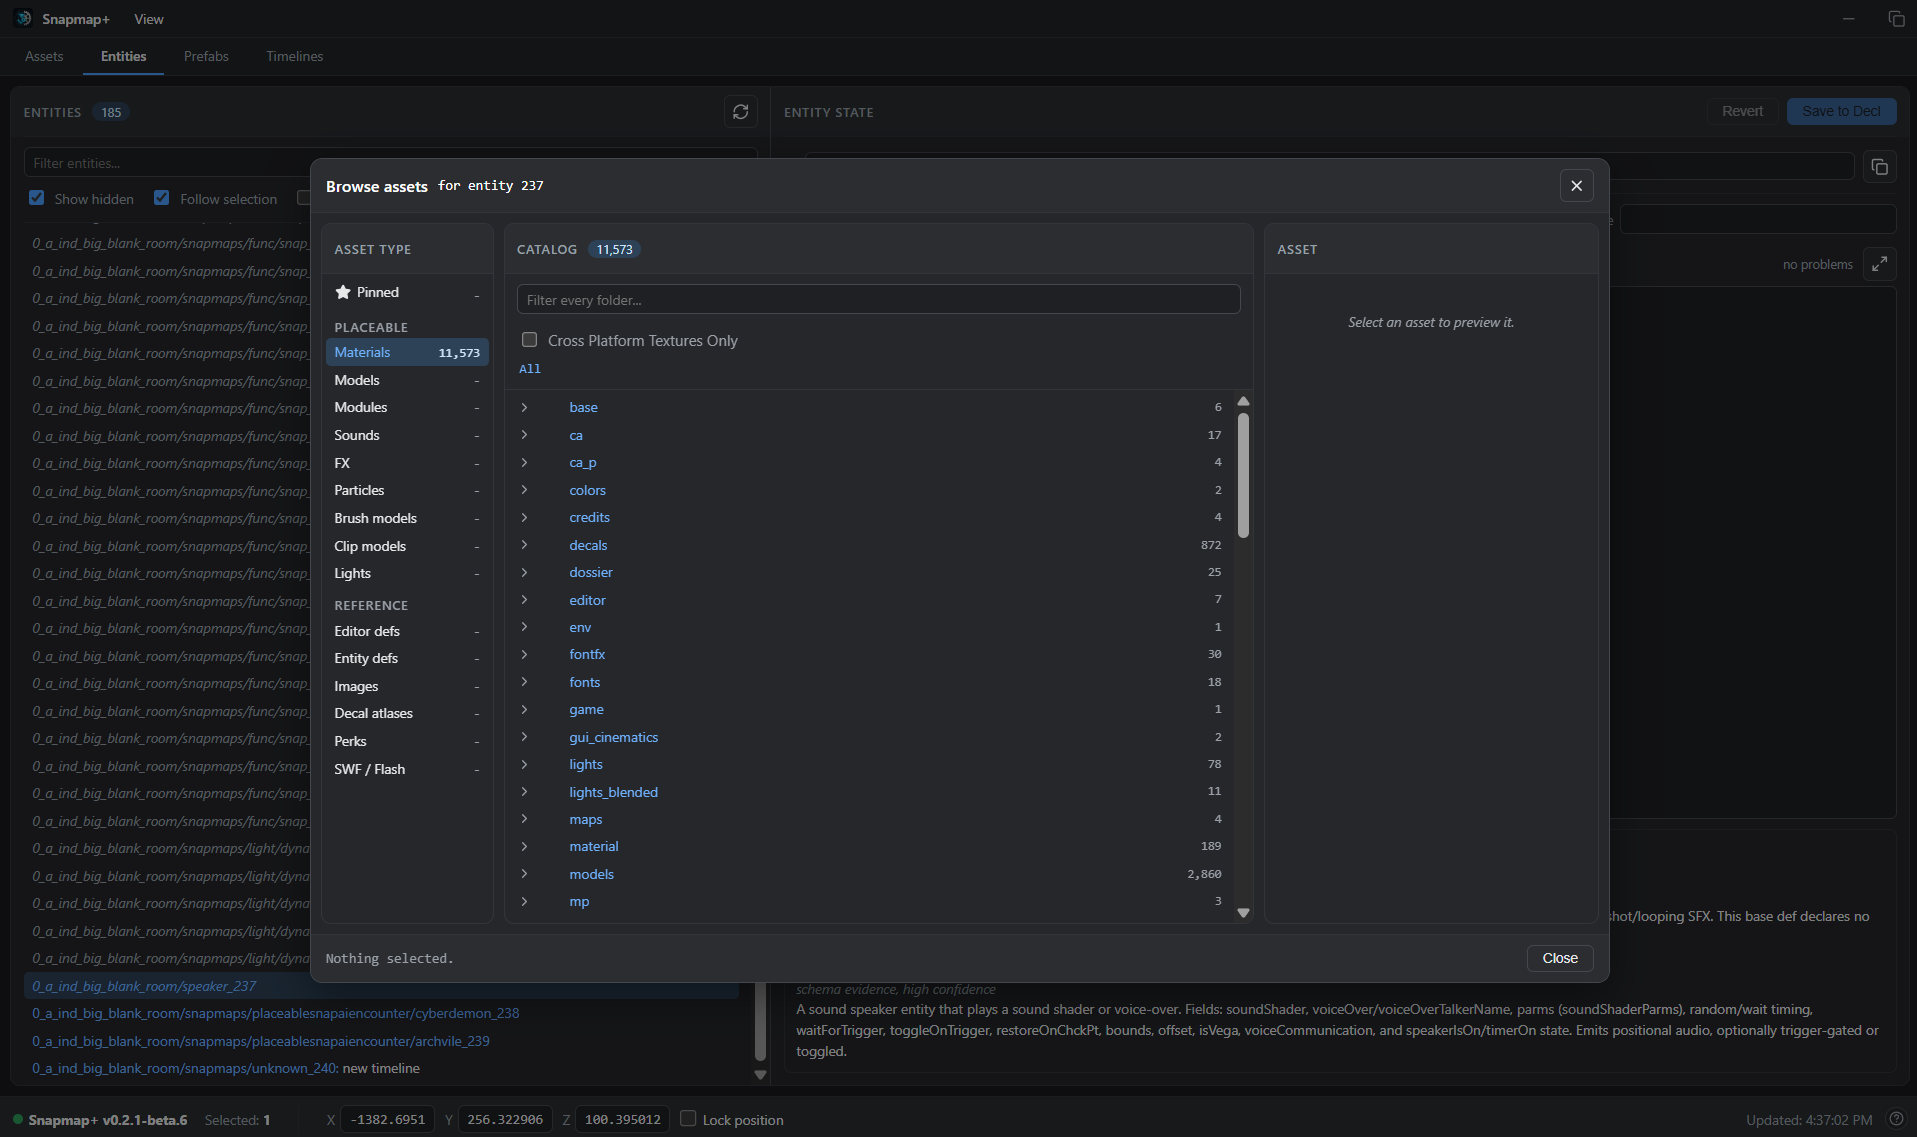
- Browse assets… opens the Assets tab as a modal, scoped to whichever entity is currently selected — a shortcut for retexturing or reassigning a model/sound without switching tabs.
Follow Selection and Select in 3D are opposite directions of one mode, so they cannot be enabled together. Snapmap+ remembers the direction you choose (or that both are off) for the next launch.
- Deselect clears whatever’s selected in the 3D editor. Occasionally clicking off an object in-game doesn’t fully deselect it — this button is a reliable way to force it.
Right-clicking one or more selected rows gives you:
- Copy ID — copies the reference ID(s) to your clipboard, for pasting into another entity’s property
(e.g. a
targetslist — see Targets and Logic Signaling). - Delete — deletes the entity(ies) exactly as pressing Delete in the 3D editor would, following the same rules: objects the editor protects and room doors or caps are not deleted, and Ctrl+Z undoes it like any other delete. A message says what was deleted, or why nothing was.
- Push to stack 0 — adds the entity(ies) to SnapStack’s scratch stack 0 (see SnapStack).
- Clear stack 0 — empties stack 0 out, regardless of what’s currently selected.
Entities that ship as part of the map’s module (rather than ones you placed yourself) also show up in
this list — editing or deleting those isn’t permanent; they reset the next time the map reloads. If you
need one gone for good, deleting it directly won’t stick — instead, signal it (via a targets list, or a
Timeline) to a Remove node/command.
The Entity State Panel
Selecting an entity (in the list, or in-game with Follow Selection on) opens its Entity State panel on the right.
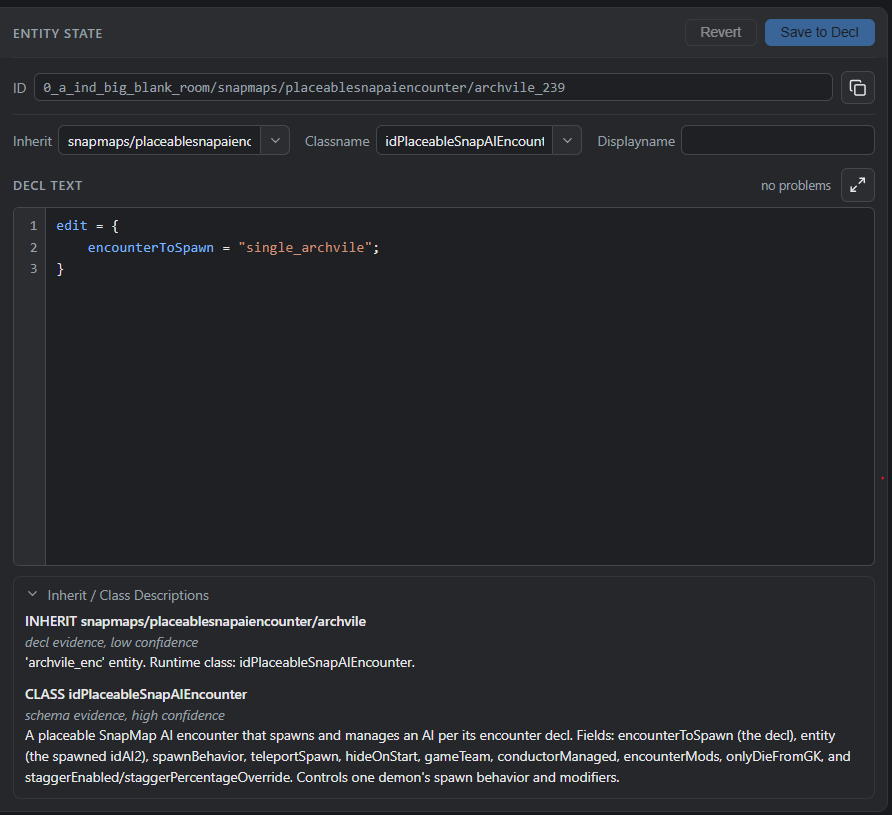
- ID — the entity’s reference ID, read-only, with a Copy button.
- Inherit and Classname — together, these determine what kind of entity this is (see Reclassing an Entity). Each has a dropdown of known values, but you can also type a value that isn’t listed.
- Displayname — the name shown in the SnapMap editor and in the Entities list (not shown to players in-game). Editing it here bypasses the editor’s character limit, and works even on entities the stock editor won’t let you rename (filters, for instance).
- Decl Text — the entity’s full underlying declaration, in the format described in Understanding the Decl Format. This is the same data the Properties menu edits a slice of — here you see and can edit all of it. Syntax is colorized as you type, and anything the checker flags (an unknown property, a value that doesn’t look like the type it expects, an enum value outside the known set) shows up as an underline plus a count in the corner — hover a warning to jump to it. A count of “no problems” doesn’t guarantee the map will load — the checker catches likely mistakes, it doesn’t validate everything the engine does.
- Focus mode (the expand icon next to the problem count) — expands the decl editor to fill the window, hiding the fields above and below it, for distraction-free editing of a long decl. Save, Revert, and the problem count stay right there next to the toggle; press Esc or click the icon again to leave.
- Save to Decl — commits your edits (Ctrl+S works as a shortcut while the decl editor has focus). Most visual changes won’t appear in the 3D editor until you reload the map (copy-pasting the entity, or playing the map, will reflect the change immediately even without a reload). You still need to save the map itself from SnapMap’s own menu — Save to Decl only writes the change into the in-memory map the editor is holding.
- Revert — discards your unsaved edits, reloading the entity’s last-saved state.
- Inherit / Class Descriptions (collapsible, below the editor) — a short description of what the current inherit and classname actually are, when Snapmap+ has one on file.
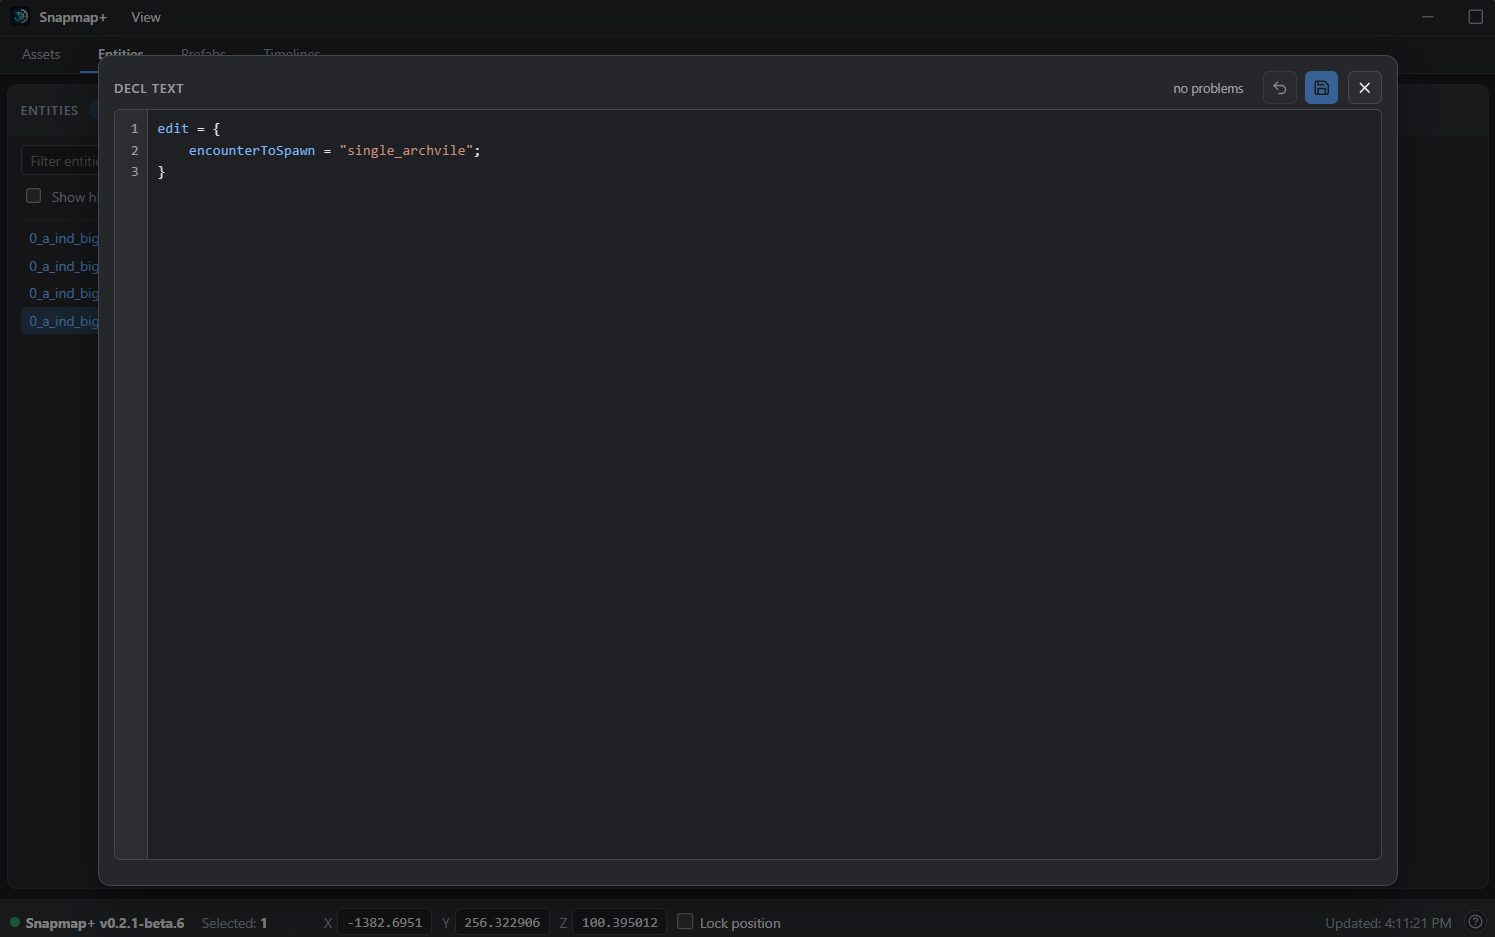
Understanding the Decl Format
The Decl Text editor uses the same syntax the engine itself uses to store entities, so it’s worth learning the shape of it before you start editing.
A property is written as propertyName = value; on its own line — the semicolon matters; a missing one
can produce an error when the map loads. A value that’s text (a file path, an entity ID) needs quotes:
propertyName = "some/file/path";
Many properties are themselves a nested group of sub-properties, wrapped in braces:
scale = {
    x = 64;
    y = 64;
    z = 64;
}
Nesting can go arbitrarily deep — indentation is optional, but keeping it consistent makes it much
easier to keep track of which brace closes which. If your braces don’t balance (a { with no matching
}, or vice versa), the map will fail to load. Everything for the entity needs to sit inside the
outermost edit { ... } block. If you accidentally duplicate a property, only the last copy of it
survives a save.
Some properties are lists, using a slightly different shape:
renderModels = {
    num = 3;
    item[0] = "models/mapobjects/snapmaps/box_trigger.lwo";
    item[1] = "models/mapobjects/snapmaps/dynamic_block_solid.lwo";
    item[2] = "models/mapobjects/snapmaps/dynamic_block_textured.lwo";
}
item[N] entries are the list’s contents, numbered from 0; num is the count. Keep num accurate —
too low, and Save to Decl will silently drop the out-of-range items; too high, and the game can crash
when you try to play the map. You can freely add or remove items as long as you keep num matching.
A couple of things to keep in mind while editing:
- Most visual changes won’t show up in the 3D editor until you reload the map, copy-paste the entity, or play the map — the underlying data is correct immediately, the editor’s live view just doesn’t refresh itself.
- Custom materials specifically don’t preview in the editor at all except on Blocking Volumes — you’ll need to play the map to see how one actually looks, or temporarily apply it to a Blocking Volume if you want an in-editor preview.
Common Properties
A handful of properties come up constantly:
model (inside renderModelInfo) sets what an entity looks like, referencing a model file path.
Works on any entity.
renderModelInfo = {
    model = "zion/characters/monsters/lostsoul/base/lostsoul.md6";
}
scale is a size multiplier on the model — 2 doubles it, decimals between 0 and 1 shrink it, and a
negative value on one axis flips the model. This goes further than the in-game Size field for Blocking
Volumes: you’re not limited to whole numbers or the in-game max size.
customMaterial re-textures the entire model with the material specified:
renderModelInfo = {
    model = "models/snapmaps/props/hell/monster_skull_01.lwo";
    customMaterial = "textures/snapmaps/hotspots/ind_panels_steel";
}
There are many more properties beyond these — most Snapmap+ users end up picking them up from community references and experimentation, since there isn’t a single authoritative list.
AI navigation on Blocking Boxes
Enable AI Navigation and Block Demons on a Blocking Box to use its exposed, walkable surfaces for demon navigation. Rotating a box can make one of its sides the new walking surface. Slopes retain their actual angle, and overlapping boxes contribute their exposed surfaces.
Default-sized boxes work too, including in maps created before Snapmap+ was installed. You do not need to resize a box or recreate the map to enable navigation.
For a wall that demons should go around, leave AI Navigation off and keep Block Demons on. Ordinary Blocking Boxes already participate as obstacles, including where they overlap custom navigation. Enable AI Navigation when the box should also provide a walkable top or slope. Vertical walls and downward faces do not become walking surfaces; climbing uses approach and landing connections between valid surfaces.
The green preview shows the smallest demon navigation size. Larger demons need more standing room and clearance, so a narrow green surface may still be too small for a hell knight. Climbing also requires an available traversal animation and clear approach and landing positions; the floor-side positions account for the whole rotated box, including an overhanging slope.
Adding boxes does not impose a fixed 2,048-traversal cutoff. There are still engine
limits on navigation complexity. If a bake cannot fit safely, Snapmap+ refuses
that module’s custom navigation and records the reason in sh_backend.log.
Use sh_navmesh in the game console for the current bake report. When a refusal
identifies boxes involved in a full route area, the preview marks them red.
That refusal concerns route complexity within an area, not a fixed number of
entities in the map. An obstructed or disconnected route can also stop a demon
without removing the navigation mesh. Leave enough room around wall ends for
the intended demon size and keep spawn, approach and landing points clear.
Build navigation from the editor’s Start menu with Build Navmesh, beside Save. The game shows Building Navmesh while the worker runs, then a native completion toast, just like ordinary Save. This does not save or name the map, and it does not require a player start. It also works in Blueprint mode and with the green preview turned off.
The same operation is available through View > Update Navmesh in Snapmap+.
The preview is read when the map opens and when you request an update.
Editing does not read the map. When you add, delete, move or change
the flags of a box with AI Navigation or Block Demons, the View menu says
Navmesh is out of date. Other edits do not change it. The preview hides while
geometry is held. Play always uses the current map: if it changed since the last
update, Play bakes it again. If the View menu says Could not read this map,
run sh_navmesh for the reason.
Duplicated boxes that share an ID keep their navigation when the map assigns
that ID to one module. An ID assigned to different modules is ambiguous and
still refuses the bake.
Baking runs in the background, so the previous lines can remain briefly while the new
result arrives. sh_perf reports time spent reading the map and building the
preview; sh_perf reset clears those counters.
The Assets Tab
The Assets tab is a searchable browser over everything DOOM’s own shipped files contain — every material, model, sound, light, particle and more — with a live preview and one click to put what you found onto your map. Nothing here is a bundled list Snapmap+ ships: the catalog is built by reading your own installed game files the first time you open each category, so it’s always exactly what your copy of DOOM has.
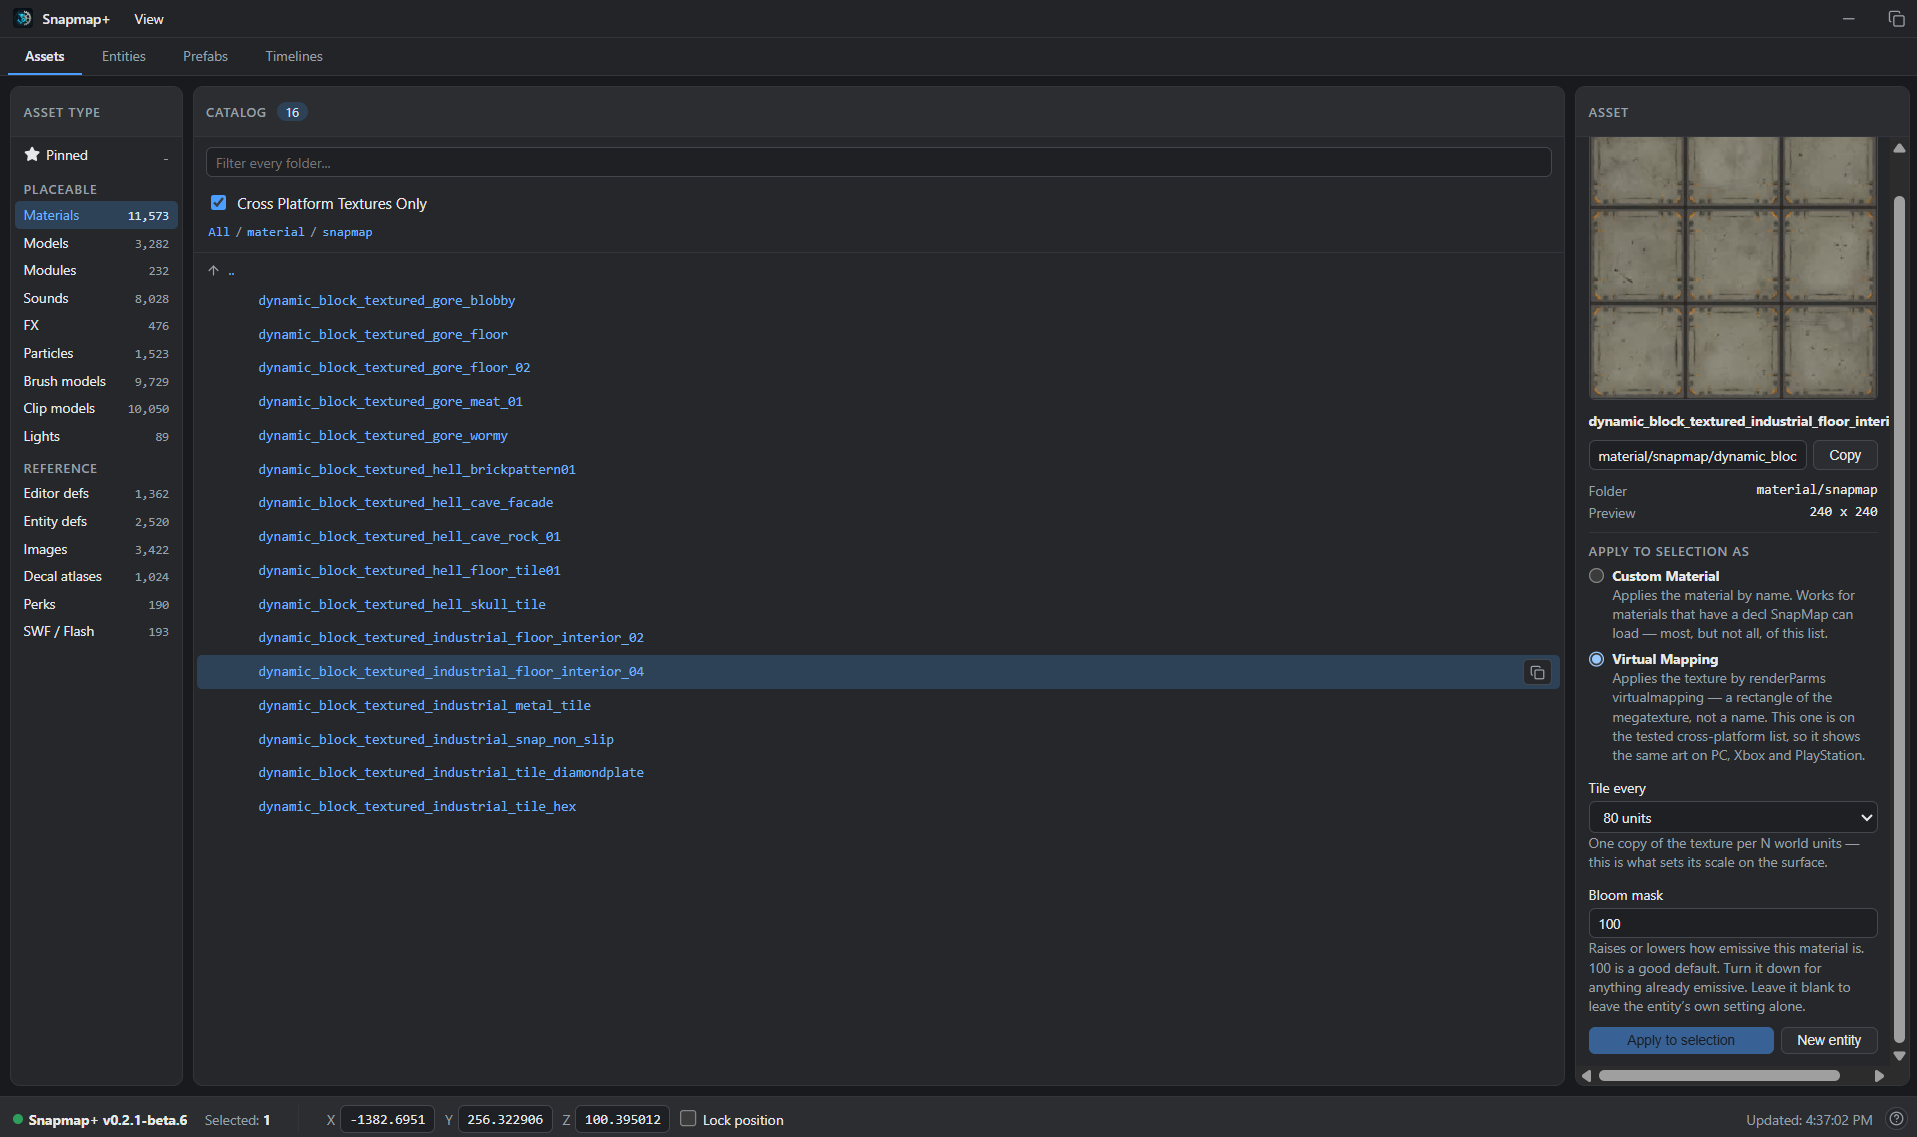
The tab is three columns:
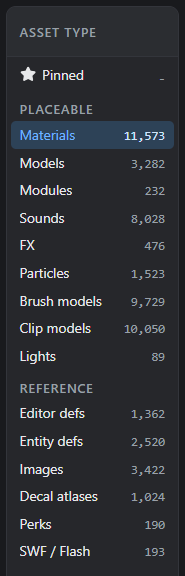
Asset Type (left) — pick a category. Placeable categories are things you can actually put on the map:
| Category | What it holds |
|---|---|
| Pinned | Your own shortlist — star any asset from its row to add it here, regardless of type. Handy for the handful of things you’re using right now. |
| Materials | Surfaces/textures. A Cross Platform Textures Only filter narrows this down to the ones confirmed to look the same on PC, Xbox, and PlayStation. |
| Models | Props. |
| Modules | Whole pre-built SnapMap rooms — placing one drops a single entity that’s both visible and solid. |
| Brush models | The individual wall/floor/detail pieces those rooms are built from. |
| Clip models | Collision shapes, placeable on their own. |
| Sounds | Filed by soundbank rather than by name — most raw sound names are near-identical, so the bank is the only grouping that actually helps. |
| Lights | The light material — the pattern a light shines through. Point vs. spot is chosen separately, from Create as (see below). |
| FX, Particles | The remaining placeable effect types. |
Reference categories (Editor defs, Entity defs, Images, Decal atlases, Perks, SWF/Flash) are look-up
only — useful for finding a name to type in by hand, but nothing to click-apply, since there’s no single
right way to wire something like a Perk or a .swf screen into an entity.
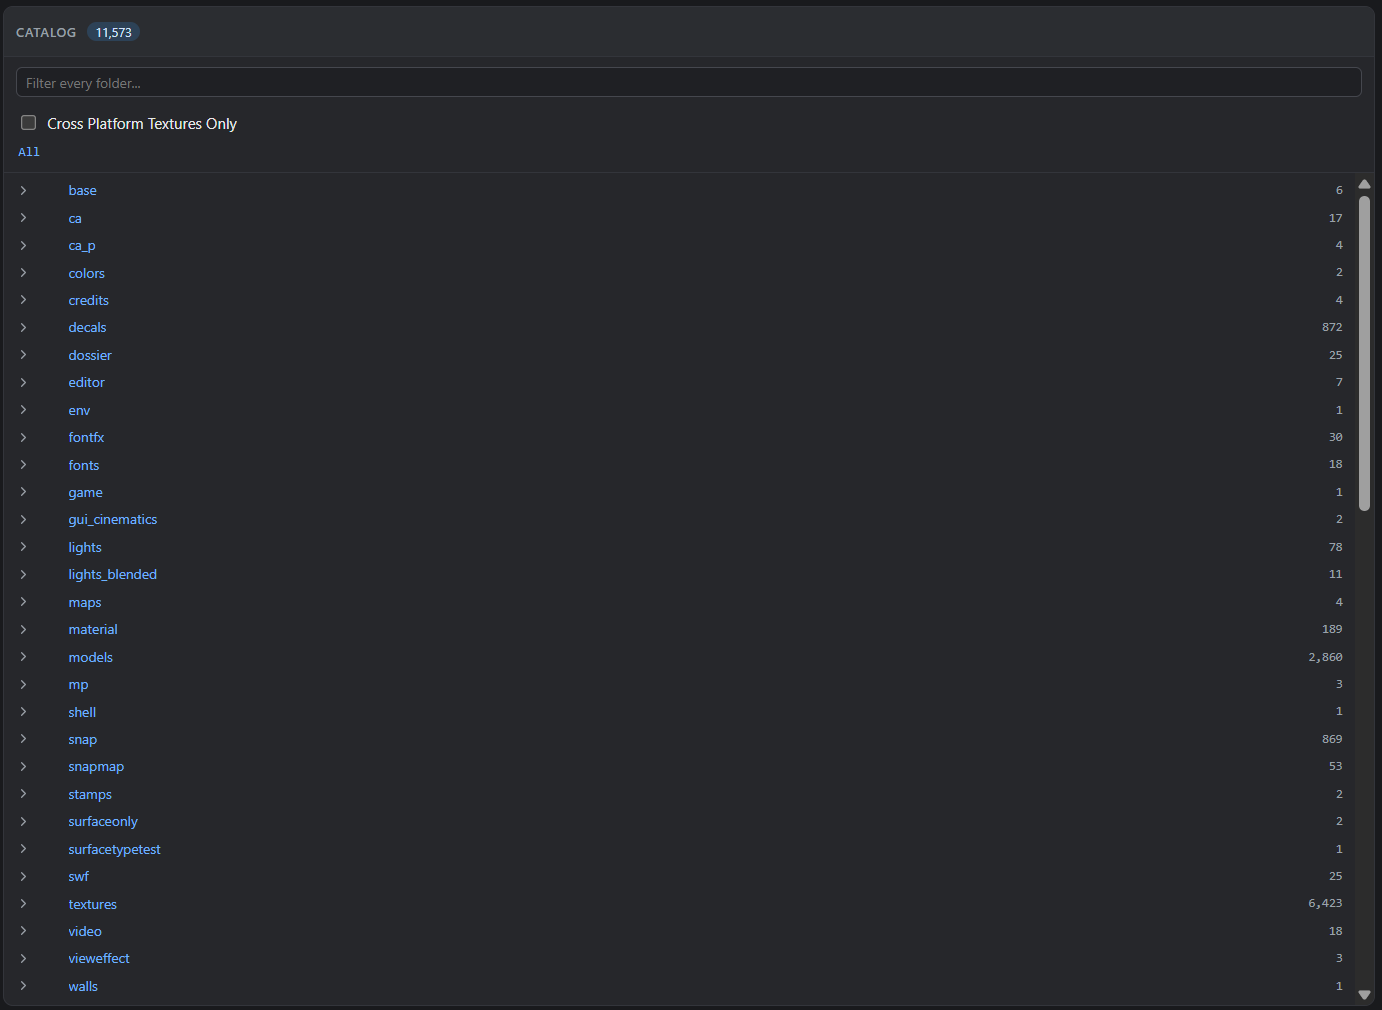
Catalog (middle) — browse a category’s folder tree, or type into Filter every folder… to search across all of it at once. Folders show how many assets are inside; click through, or search, until you land on the thing you want.
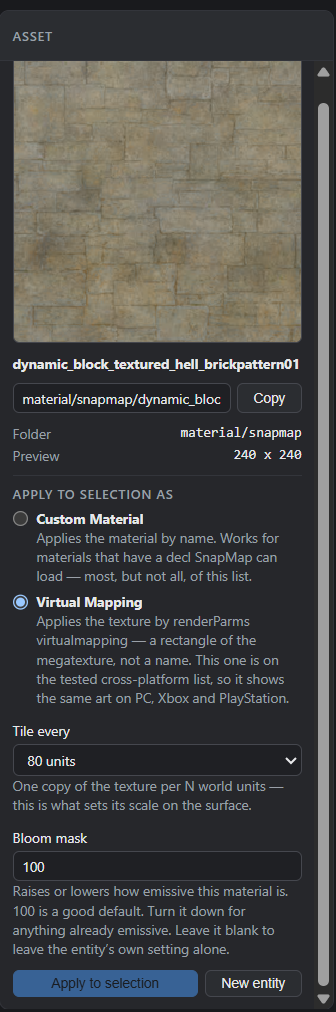
Asset (right) — once you pick something, its actual preview shows here: materials and images render as real pixels (decoded straight from the game’s own texture data, not a stand-in icon), and sounds get a play/stop button so you can listen before committing. Below the preview:
- Copy — copies the asset’s path, for pasting into a decl by hand.
- Apply to selection — writes the asset onto whichever entity you currently have selected, immediately.
What it writes (and which entities will accept it) depends on the asset type: a material sets
customMaterial, a model setsrenderModelInfo.model, a sound setssoundon a speaker, and so on. If the selected entity’s class can’t use that kind of asset, Snapmap+ tells you why instead of quietly doing nothing. - New entity — instead of applying to a selection, stages a fresh one-entity prefab holding the asset, picked up and ready to place exactly like Ctrl+V.
- A material specifically offers Custom Material (applies it by name) or Virtual Mapping (applies it as a rectangle of the shared megatexture instead of by name — the way to reach materials that have no name of their own) — plus a Tile every size and a Bloom mask strength.
Reaching it from an entity you already have selected: click Browse assets… on the Entities tab to open the same browser shown above as a modal, scoped to that entity — apply an asset straight to it without leaving the Entity State panel.
Reclassing an Entity
Every entity has an inherit and a classname. Changing either — or both — turns one type of entity into another.
classname determines the entity’s actual type in the engine, and what properties are meaningful for it. inherit determines what default values it starts from, and how the entity behaves while you’re still in the editor. The two have to agree with each other — a classname/inherit mismatch is a reliable way to crash the map.
Props are the safest thing to reclass. They have no placement or rotation restrictions, and they don’t carry hidden properties left over from a different entity type that could conflict with the type you’re converting to.
Inherit:   snapmaps/volume/blocking
Classname: idVolume_Blocking
A worked example — turning a prop into a Mover (a scriptable-movement entity):
- Change Classname to
idMover - Change Inherit to
snapmaps/func/snap_lift - Save to Decl
- Save the map and exit the editor
- Re-open the map
Change both fields, then save — changing one and saving before the other is exactly the mismatch that crashes the map.
The Custom Palette Tab
Some entities exist in the DOOM engine but have no resource file made for SnapMap, so there’s nothing to
put in inherit for them. Snapmap+ handles this with a generic snapmaps/unknown inherit that’s
compatible with any classname — no mismatch risk, regardless of what type you’re setting up.
Rather than making you build one of these by hand every time, Snapmap+ seeds ready-to-place starting
points — Unknown, Timeline, and Lift — directly into DOOM’s own Create menu, under a
“*Custom” tab. These ship as Snapmap+’s own built-in overrides — the same mechanism you
can use yourself to add your own declarations, served from memory rather than written into your
overrides\ folder.
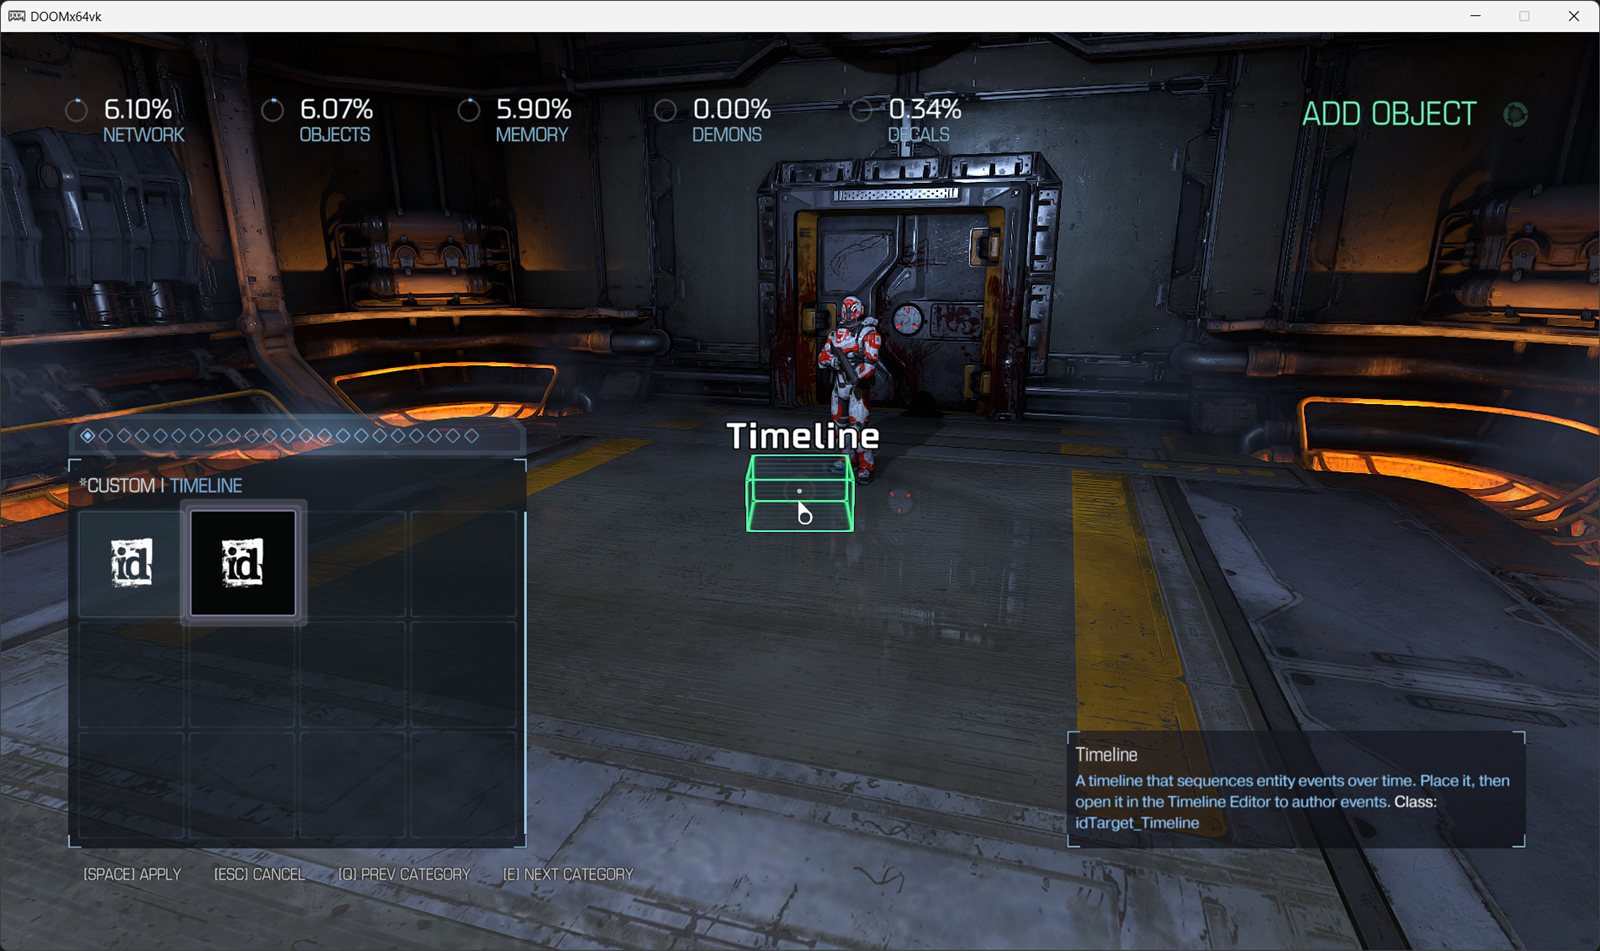
Drop either one in like any other object, then reclass it from there (see Reclassing an Entity) if you want a specific engine type rather than a bare Unknown. If no model is set, an Unknown entity shows as a wireframe box in the editor — that box never appears in the actual game, it’s an editor-only placeholder.
Steps to reclass one manually, if you’re not starting from the *Custom tab:
- Change Classname to the type you want.
- Change Inherit to
snapmaps/unknown. - Save to Decl — only after both fields are changed, not one at a time, or the map will likely crash from the momentary mismatch.
- Save the map, exit, and re-open it (or copy-paste the entity and delete the original).
Targets and Logic Signaling
Every entity in the engine can have a targets list — this is a lower-level version of the signal
system SnapMap’s own logic nodes are built on top of. Adding an entity to another’s targets list has
the same effect as drawing a SnapMap logic line between them:
targets = {
    item[0] = "1_ind_totally_blank_room_4x/snapmaps/unknown_3923";
    num = 1;
}
What happens when the signal arrives depends on what’s receiving it. Signaling an FX or a light directly
toggles it on/off. Entities with a classname starting idTarget_ do something more specific when
signaled — idTarget_Damage deals custom damage to everything in its own targets list,
idTarget_DummyFire fires a projectile at them, and so on; think of these as the engine-level version of
SnapMap logic Inputs like “Spawn Object” or “Start Timer”.
Because targets and SnapMap’s own logic system both drive the same underlying signal, you can mix
them: add a targets list to a SnapMap logic output (On Spawned, On Entered, On Used…) or a
filter (Player Filter, Boolean Filter…), and firing that output/filter also signals whatever’s in
the list — letting your normal SnapMap logic reach entities that aren’t SnapMap logic nodes at all.
sh_target_any (a DOOM console command — press ~ to open the console) is a second way to wire
this up, without touching decl text at all.
While it’s toggled on, entities that would normally need a targets list become valid endpoints for the
native wire tool — so you can drag a wire from a logic node straight to one, the same way you’d wire two
ordinary SnapMap logic nodes together, instead of typing an ID into a targets list by hand. Run
sh_target_any again to turn it back off and return to normal SnapMap logic wiring.
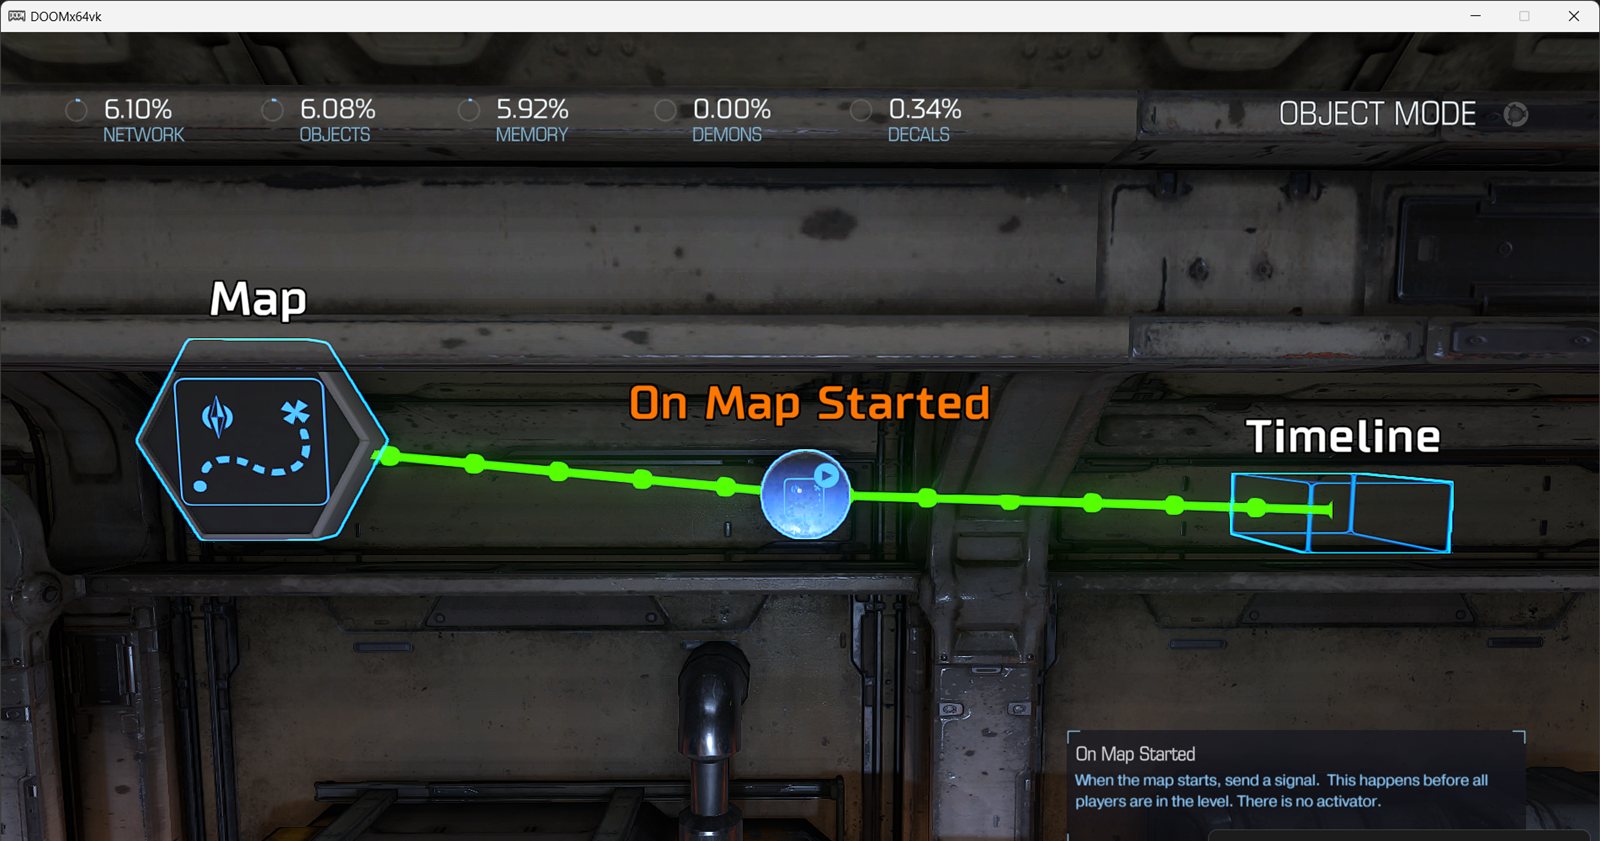
A lot more becomes possible once you’re editing raw decls directly – turning entities into Movers (scripted movement/rotation), universal entity spawners, Particle Emitters, custom-animated models, and binding entities together so they move as one. That’s engine-level territory rather than a Snapmap+ UI feature as such, so it’s covered separately rather than here.
The Prefabs Tab
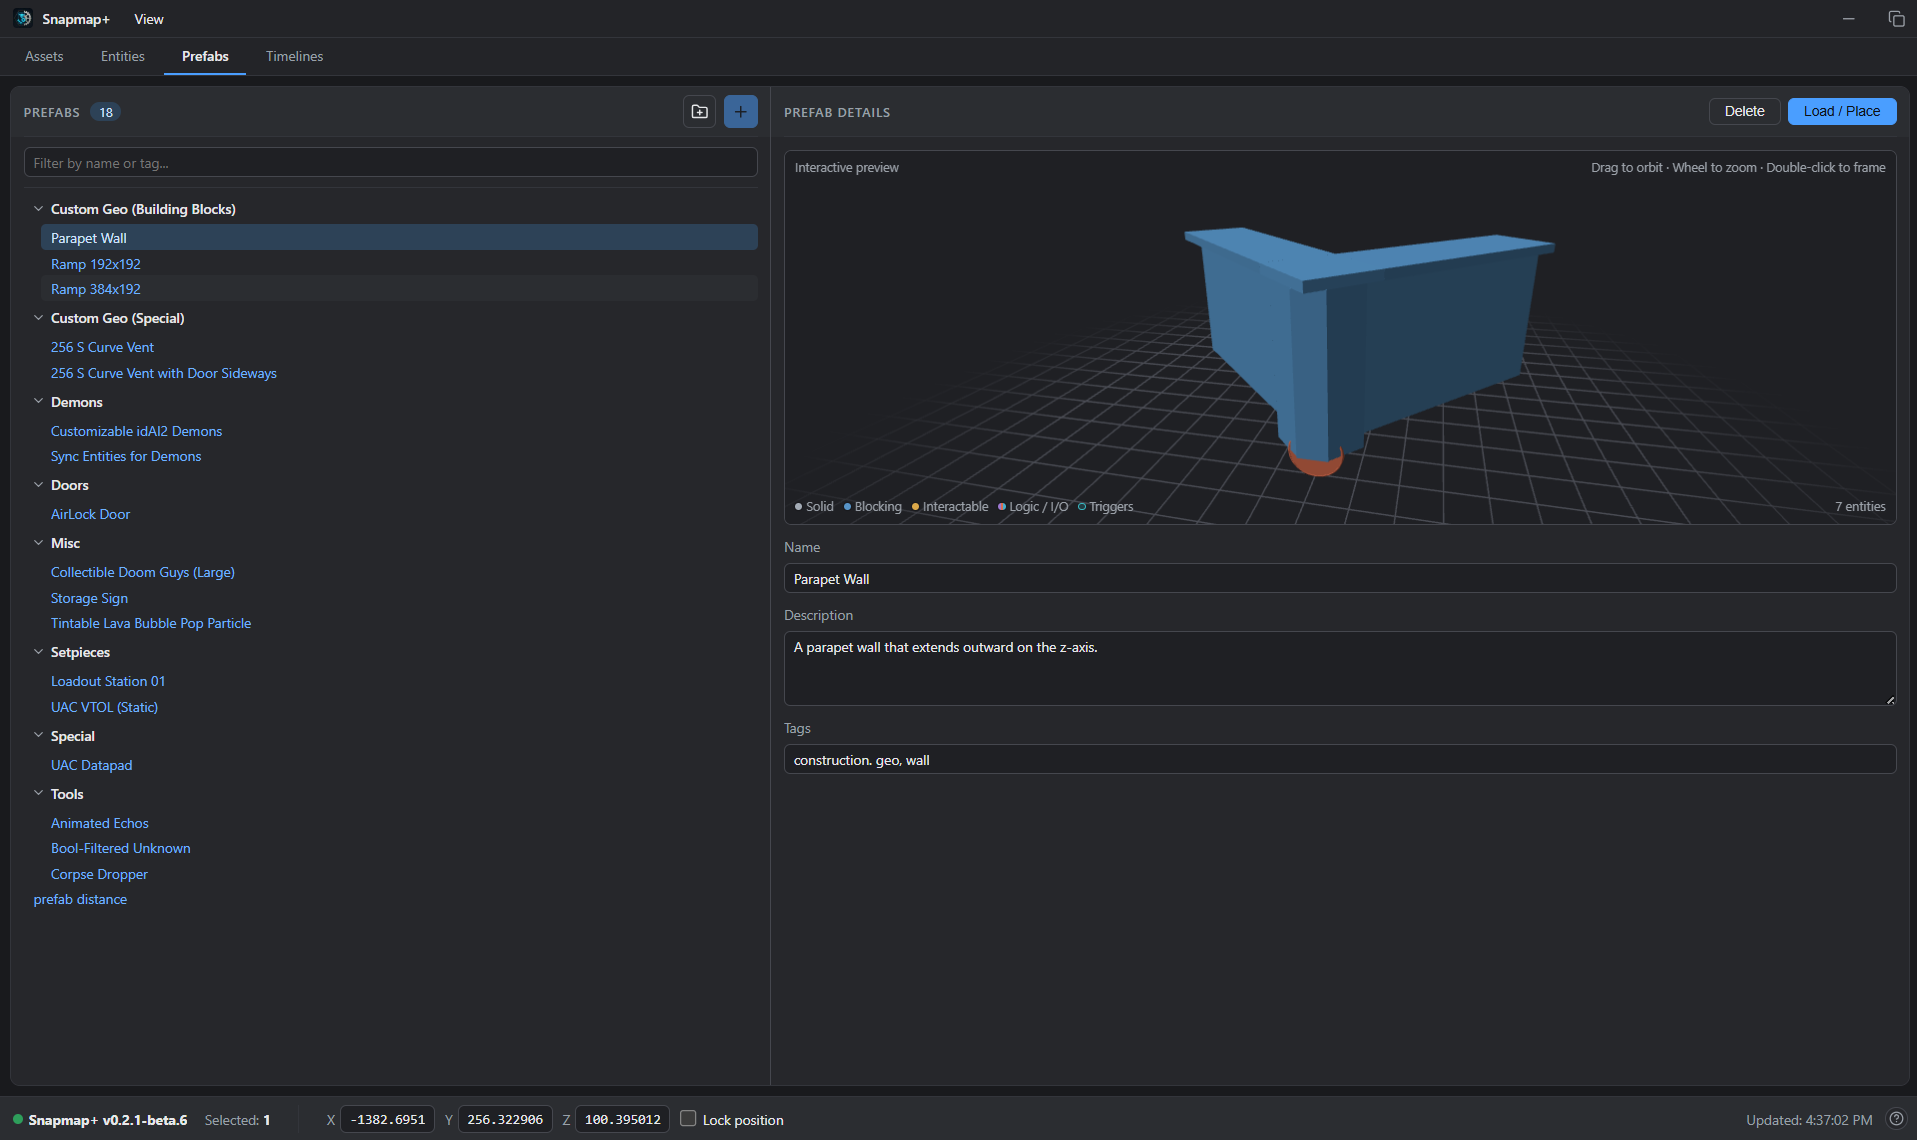
The Prefabs tab saves a group of entities so you can reuse it later, or share it with someone else running Snapmap+.
Creating one: select the entities in the SnapMap editor, then click Create from selection. Give it a name, and it’s added to the list. Your cursor must be hovering one of the selected objects when you do this — whichever object that is becomes the one centered on your cursor when you later paste the prefab back in.
Using one: select a prefab in the list to see its details on the right — its name, description, and tags, plus an interactive 3D preview of what you’re about to place: drag to orbit, scroll to zoom, double-click to frame it. The preview colors entities by what they do — solid, blocking, interactable, logic/I/O, triggers — so you can tell what a prefab actually contains before you drop it in. Click Load / Place to stage the prefab for placement with SnapMap’s built-in paste function, then switch to the editor and press Ctrl+V to actually drop it into the map.
Organizing: New Folder creates a folder you can drag prefabs into; Filter prefabs… narrows the list by name. Selecting a prefab and clicking Delete removes it permanently.
Prefabs are stored as individual files under %LOCALAPPDATA%\snapmap-plus\prefabs\ — sharing one is just
sending someone that file; they drop it into their own prefabs folder (or the matching subfolder, to
land it in the same folder on their end) and it shows up in their list. You can drop a file into that
folder from Windows while Snapmap+ is already running — no restart needed, it picks the new prefab up
right away.
The Timelines Tab
A Timeline is a single entity that can run multiple scripted actions, on multiple other entities, at the same or staggered times. Timelines are painful to set up by hand in the raw decl text, so Snapmap+ gives them a dedicated editor.
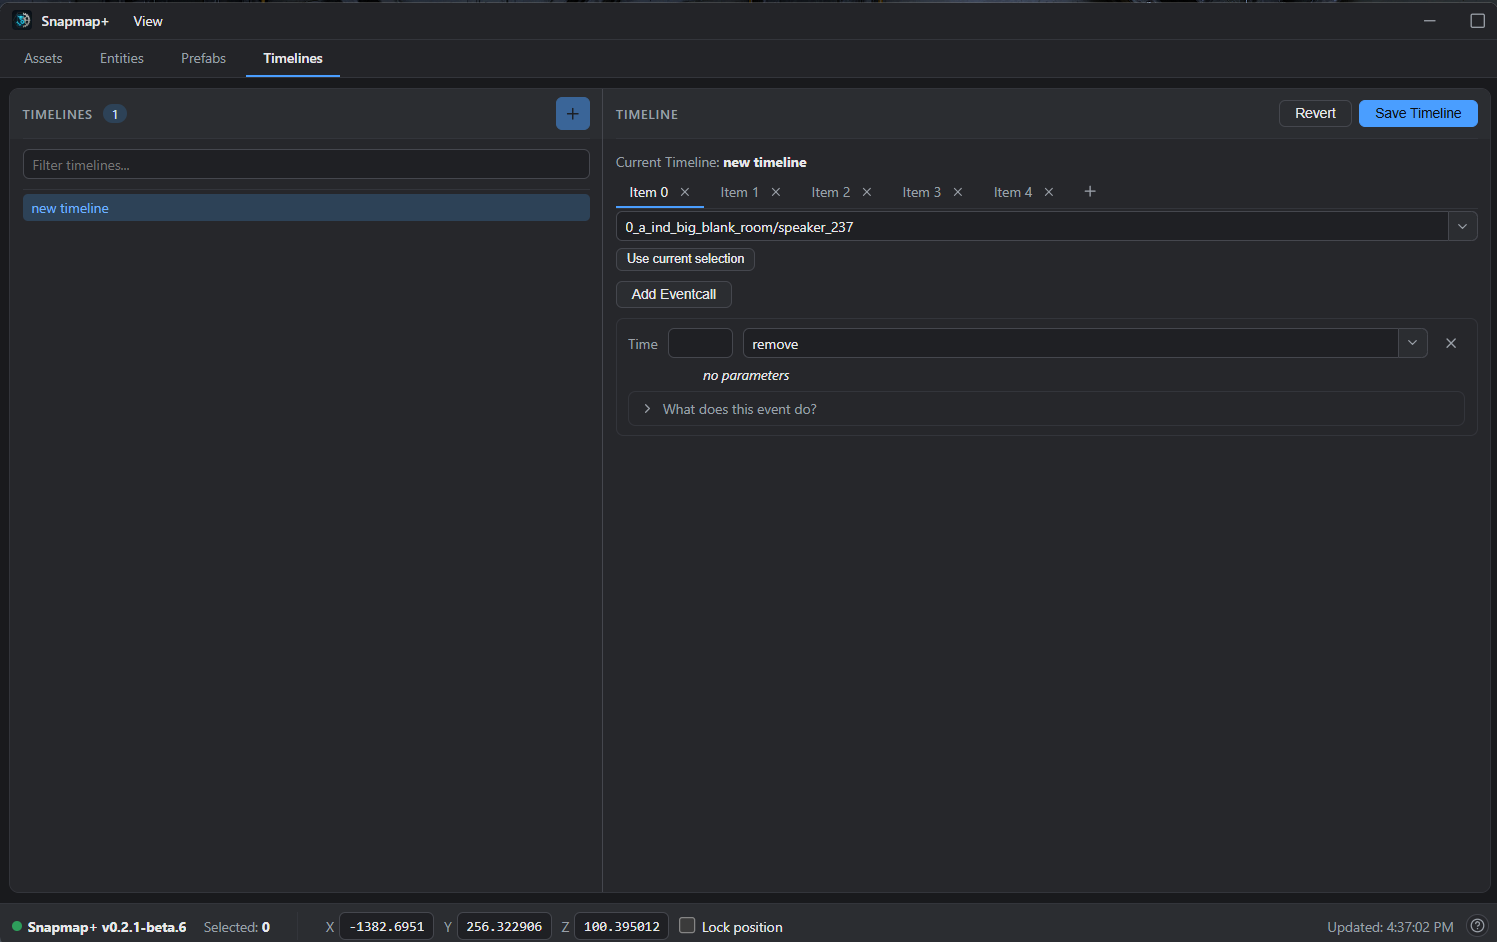
Getting a Timeline into your map: place one from the *Custom palette tab (see The Custom Palette Tab) — this is the reliable way to do it, since it comes with a valid module location already baked in. It’s worth giving each Timeline a unique Displayname so you can tell them apart in the list.
Once it’s placed, it shows up here automatically — find it in the list and double-click to open it in the editor on the right.
A Timeline is organized into entity events and eventcalls. For every entity you want to script, you add one entity-event tab; under that tab, you add one eventcall per script you want to run on that entity.
- The + tab adds a new entity-event tab, labeled Item N (matching the underlying decl’s own
item[N]numbering). - Runs on picks which entity that tab’s eventcalls apply to — type an ID, pick from the dropdown, or select the entity in the SnapMap editor and click Use current selection (exactly one entity must be selected for that to work).
- Add Eventcall appends a new, blank script call under the current tab.
- Each eventcall has a Time (milliseconds of delay between the Timeline firing and this eventcall running — can be left blank) and an event/script name — type to search, or pick from the dropdown. Once a script is picked, its specific parameters appear below it as proper typed fields (a checkbox for a boolean, a coordinate row for a vector, a constrained dropdown for a decl/enum reference) — unlike Time, every one of these needs a value, or you’ll hit errors.
- What does this event do? (collapsible, under a configured eventcall) gives a short explanation of the selected script, when one’s on file.
- Save Timeline commits your edits to the Timeline entity. As with any other entity, you still need to save the map itself from SnapMap’s own menu afterward. Revert discards local edits and re-reads the Timeline as it currently exists on the map.
A Timeline isn’t a native SnapMap logic node, so signaling it only works through
Targets — either by adding its ID to another entity’s targets list
directly, or by turning on sh_target_any and wiring it up with the native wire tool.
Rawmaps
A rawmap is a human-readable JSON copy of a map. Use one to share a map
without publishing it, keep backups, or edit its contents in a text editor.
The default file is %LOCALAPPDATA%\snapmap-plus\rawmap.json.
All rawmap actions are in the File menu:
| Menu option | What it does |
|---|---|
| Load Rawmap… | Pick a rawmap file. Snapmap+ asks if you want to open it now. OK opens it as a new map and discards unsaved edits in the editor. Cancel keeps the file waiting, so you can save your work first. |
| Save Rawmap | Write the map you are editing to the Save Path, including unsaved edits. |
| Save Rawmap As… | Pick a file and write the map you are editing to it. Later Save Rawmap clicks go to the same file. |
| Open file as New Map | Open the rawmap that is waiting. It shows the file name, and it is grey when no file is waiting. Use it after you cancel Load Rawmap…, or to open a rawmap again after you change it in a text editor. |
| Keep This Save Path | Ticked after Save Rawmap As…. Untick it to send saves back to the default file. Opening another map also sends saves back to the default file. |
| Use Rawmaps for Every Save/Load | Off by default. On, every map you open is replaced by the Load Path file, and every DOOM Save also writes the Save Path file. The console commands sh_rawmaps_on and sh_rawmaps_off do the same. |
Under these options, Load Path and Save Path show the files Snapmap+ uses. Hover over one to see the full path.
A rawmap you open is a new map. DOOM’s own Save asks for a new name, so it does not replace the saved map it opened over. If Snapmap+ cannot give that protection, it refuses to load rawmaps. Opening a rawmap in place needs at least one local map saved through DOOM. You can also open a map from DOOM’s list while a rawmap is waiting.
A save is refused when no map is open in the editor. A save is cancelled if you leave the map before it runs.
Rawmaps are saved as compact JSON on one line. To save them with line breaks and
indents, type sh_pretty_on 1 in the console before you save. Type
sh_pretty_on 0 to go back to compact JSON.
Run sh_rawmaps help for the console commands. sh_rawmaps list [folder]
lists rawmap files, sh_rawmaps load <path> stages a file, sh_rawmaps load
opens it, and sh_rawmaps save [path] exports the live map. Console loads
discard unsaved edits without a confirmation prompt. The advanced command
sh_rawmaps overwrite on allows DOOM’s Save to replace the borrowed saved map;
that choice lasts only until DOOM closes. Keep it off to preserve that map.
SnapStack (Bulk Editing)
SnapStack lets you edit many entities at once from the DOOM console (press ~ to open it),
instead of one at a time through the Entity State panel. Every command starts with sh.
The stack/group model
Most SnapStack commands work against a stack — a scratch list of entities, numbered (stack 0 is the default) — or a group, a named list that (unlike a stack) doesn’t get cleared out after you use it. Groups are what you want for running several edits against the same set of entities without reselecting them each time.
sh psel [stack]— takes your current in-game selection and pushes it onto a stack (default stack 0). De-selects everything in-game once it’s stored, and reports how many entities landed in which stack. Right-clicking a row in the Entities tab and choosing Push to stack 0 does the same thing for that one entity.sh phov [stack]— pushes whatever entity you’re currently hovering (not necessarily selected) onto a stack. Pushing the same one twice doesn’t duplicate it.sh pr [stack] [lo] [hi]— pushes every valid id in the inclusive rangelo..hionto a stack, without needing to select any of them first.sh pg [name] [stack]— pushes a named group’s ids onto a stack (sh pg [name]alone targets stack 0) — the reverse direction ofpop2gbelow.sh pop2g [stack] [name]— moves a stack’s contents into a named group (replacing that group’s previous contents, if any).sh popsel [stack or group]— re-selects, in-game, everything stored in a stack or group. Useful both for finding something you can only see in the Entities list, and for pulling a group’s contents back into a stack you can run other commands against.sh cstk [stack]— empties a stack out. (Right-clicking in the Entities tab and choosing Clear stack 0 does the same thing for stack 0 specifically.)
Narrowing a stack
Once a stack has entities in it, you can filter it down before running an edit — useful when a selection (or a range/group) contains more than what you actually want to change:
sh filtinh [stack] [inherit]— keeps only the stacked entities whose inherit matches.sh filtcls [stack] [classname]— keeps only the stacked entities whose classname matches.
Bulk-edit commands
All of these take [stack or group] first, then more arguments, and (when a stack is used) clear that
stack once they run:
| Command | What it sets |
|---|---|
sh bsi [stack/group] [property path] [value] |
An integer property |
sh bsf [stack/group] [property path] [value] |
A float/decimal property |
sh bsb [stack/group] [property path] [value] |
A boolean property (true/false) |
sh bss [stack/group] [property path] "[value]" |
A string property (quote the value) |
sh bsin [stack/group] [inherit path] |
The inherit of every entity in the stack/group |
sh bscls [stack/group] [classname] |
The classname of every entity in the stack/group |
sh bsincls [stack/group] [inherit] [classname] |
Both inherit and classname together, safely (no momentary mismatch) |
sh bse [stack] [property path] |
Sets a string/reference property on every OTHER entity in the stack to the ID of the LAST entity selected before sh psel |
sh accl [stack] |
Pops the LAST entity selected before sh psel as a receiver, and reference-assigns every OTHER entity in the stack onto it |
sh acctargets [stack] |
Appends every OTHER entity in the stack to the targets list of the LAST entity selected before sh psel |
[property path] uses dots for nested properties — clipModelInfo.size.x, renderModelInfo.color.r,
and so on, the sub-property you want to change written last. Get inherit/classname wrong together
(with bsin/bscls alone rather than bsincls) and you risk the same mismatch crash as reclassing a
single entity by hand — see Reclassing an Entity.
bse, accl, and acctargets all need to know which entity was selected last — since groups don’t
track that, those three only work against a stack.
One more, a bit different from the rest: sh mkcmd [stack] synthesizes a reusable command-entity
macro out of everything currently in a stack, rather than editing a property on each entity directly.
A few worked examples
Retexture a group of objects at once:
(select the objects to receive the property)
sh psel
sh bss 0 renderModelInfo.customMaterial "material/snapmap/dynamic_block_solid"
Bind several objects to a mover, all at once, with rotation:
(select the objects to bind, not the mover)
sh psel
sh pop2g 0 binds
sh bsb binds bindInfo.bindOriented true
sh popsel binds
(select the mover)
sh psel
sh bse 0 bindInfo.bindParent
Wire one entity to signal several others via targets, quickly:
(select the entities that should be signaled)
(then also select the entity that will do the signaling — last)
sh psel
sh acctargets 1
New in Snapmap+
A few extra commands beyond the original SnapStack set, for inspecting stacks/groups directly instead of guessing what’s in them:
| Command | What it does |
|---|---|
sh chkstk [N] |
Inspect stack N (ids + id-strings); omit N to summarize every non-empty stack. |
sh chkgrp [name] |
Inspect a group’s ids; omit name to list every group and its count. |
sh clrgrp <name> or sh clrgrp * |
Delete a named group entirely (* deletes all of them). |
sh snapstack_diag |
Diagnostic: reports which SnapStack implementation is currently handling commands. |
Overrides
Overrides supply editor tools, gameplay resources, or both through packages. Snapmap+ compiles those packages for the game without changing their authored files or DOOM’s installed archives. Maps carry the complete packages whose gameplay resources they use. Other Snapmap+ players can install missing content through an in-game prompt.
Authoring and organizing packages
An override package is a folder beneath %LOCALAPPDATA%\snapmap-plus\overrides\ with one
package.json and resources at their exact extracted engine paths inside assets/:
overrides/
  campaign-demons/
    package.json
    assets/
      generated/
        decls/
          entitydef/...
          material/...
          md6def/...
          sound/...
        basemodel/...
        skeleton/...
        image/...
        renderprogs/...
        spirv/...
      cooked/
        model/...
        anim/...
      md6/...
These are examples, not required directories. Preserve actual paths, extensions and renderer
permutations from your extractor. A .bmodel, MD6 mesh and MD6 declaration answer different
engine requests; moving them all into a new models/ folder would break those requests.
Only id and name are required in package.json. Requirements and strings go in the same file:
{
  "id": "campaign-demons",
  "name": "Campaign demons",
  "requirements": {
    "cvars": {
      "g_useResourceBlackList": 0,
      "g_useImageBlackList": 0
    }
  },
  "strings": {
    "en": {
      "campaign_demon_name": "Campaign demon"
    }
  }
}
Omit sections you do not need. Requirements accept supported settings, not arbitrary commands.
The ID, display name and folder name do not have to match. IDs are normalized to
lowercase automatically, with surrounding spaces, tabs and newlines removed;
display names keep their capitalization. IDs use letters and digits, with dots,
dashes and underscores allowed internally, and no consecutive dots. A UTF-8 byte-order
mark in package.json is accepted. Runtime normalization does not rewrite your files;
installer migration writes corrected metadata and keeps the original backup.
Copies or variants of one package may share an ID. Independently authored mods should
use different IDs, even when they edit the same game asset.
Maps distinguish complete bundles by their content, so different variants sharing
an ID can travel together without one replacing the other. If both need installation,
they get separate folders; their descriptors and asset trees stay intact. Sharing an
ID does not make incompatible resource edits compatible.
Optional hud.weapons.<weapon declaration name>.ammo_display accepts weapon or engine.
There are no versions, file lists, path mappings, author hashes, receipts, priorities or map-inclusion
switches to maintain. Boss startup behavior belongs in its asset declarations and travels with them.
Folders without package.json can organize packages however you like. An outer package may also
contain nested components with their own package.json and assets/; that outer package is then
one delivery unit. Most packages only need one descriptor and one asset tree.
The installer creates an empty my-overrides starter package. It has no special priority; you can
use your own package folders instead. Files outside an assets/ tree are not game resource inputs,
but auxiliary files and empty directories still travel with their authored package.
Copy a complete package into overrides to add it to your library. Remove its folder to uninstall
it. After manually adding, editing or repairing package files while DOOM is running, run
snapmap_plus_decl_server_rearm in the console and return to My Maps. The refresh waits for that
settled browser, outside an editor, transition or dialog; no game restart is needed. Map installation
requests this refresh automatically. Authored sources remain available for making new maps after
installation.
Authoring imported demons
A custom demon’s conductor declaration needs its spawn registration in aiTypeList and a matching
globalAIMods row for its AI type. Without the modifier row, the native conductor can spawn the demon
but ignore SnapMap’s Health and Damage percentages. Use neutral healthMod = 1 and damageMod = 1
defaults unless your package deliberately changes them. Keep existing rows and authored values;
package composition combines the added rows with the stock conductor and other packages.
Set the initial team in the demon’s settings. For later team changes, use the stock Encounter object’s Assign Team input with Include Spawned enabled; directly placed demons do not expose that input. Campaign bosses retain native shields, phase rules and stagger restrictions, so accepting a SnapMap setting does not remove those behaviors. A package update also does not rewrite packages already embedded in a saved map: the author must update that map’s package content to adopt a repair.
When a package cannot load
A package with a problem of its own, such as an invalid package.json, a declaration with a syntax
error, an unknown class or parent, an unsupported requirement or a file name the game cannot use, is
skipped as a whole: its nested components and assets stay unloaded together. Every other package
still loads. Run sh_packages in the console to see each skipped package folder and the reason.
Skipped files are not changed on disk, so fixing the reported problem and refreshing brings the
package back.
Some problems are not about one package. If a file cannot be read because another program has it open, or two healthy packages make incompatible edits to the same value, loading keeps the previous working result and reports the files or packages involved instead of guessing. The same happens when a declaration inherits from a new declaration that only a different package adds, so keep new parent declarations in the same package as the declarations that inherit from them. Maps are stricter: a package carried by a map must be complete and valid, or that map does not load it.
Packages from earlier Snapmap+ releases
Maps carrying packages from the older format convert automatically when opened. You do not need to enter the map first or export a rawmap. The original saved map is left intact; conversion prepares the package content for that load. Installation still asks for consent only when resources are missing, and installs complete converted packages. Saving the map carries the current package format forward.
Onboarding also imports the original SnapHak profile’s loose overrides/generated/
tree and converts it using the same rules as older Snapmap+ packages.
Earlier releases used a different layout: decls/, images/ and shaders/ folders instead of
assets/, separate resources/, requirements/, strings/ and hud/ files, a package.json
without an id, loose files directly under overrides, and shader_includes. Installing or
updating Snapmap+ converts all of these to the current format before the new DLLs are copied.
Each package converts completely or not at all. Conversion keeps your folders and package
boundaries, moves resources to their engine paths below assets/, and folds requirements, strings
and weapon HUD settings into package.json. Manifest entries become the installed game resources
they named, except resources SnapMap already ships unchanged. Loose files become a
my-overrides package. Disabled or unused files, such as .backup copies, stay in the package
outside assets/ and never become active. Declaration contents are never edited, even when they
contain a mistake.
Fresh installations create my-overrides/package.json and an empty
my-overrides/assets/ directory. Loose legacy content uses that same package
name. If a package already occupies it, migration uses the next free suffix
(my-overrides-2, and so on) without overwriting your existing files.
The originals are moved, byte for byte, to
%LOCALAPPDATA%\snapmap-plus\override-backups\migration-...\original. Nothing there is loaded
or deleted automatically. To undo a conversion, close DOOM, remove the converted package folder and
move the original back to the same place under overrides.
If you copied the DLLs by hand, or later unzip a package made for an older release into your
overrides folder, close DOOM and run this in a terminal next to snapmap-plus.exe:
snapmap-plus migrate-overrides
Add --doom "C:\path\to\DOOM" when your DOOM folder is not found automatically; loose files,
manifests and shader includes are identified from its installed resource catalog. Running the
command again does nothing to packages that are already current. A package that cannot be converted
is listed with the reason and left untouched, for example a package.json that is not valid JSON or
two files that supply different bytes for the same resource. Fix it and run the command again.
In-game package prompts
Opening a supported older map converts its package format automatically. That conversion itself has no prompt. These are the package-related DOOM dialogs:
| Dialog | When it should appear | Result |
|---|---|---|
| This map needs … mod package(s). Install it now? (Yes / No) | The installed resources do not cover the map’s supplied resources. It lists whole packages, file counts and size. | Yes installs the complete required bundles and continues that map request without restarting. No cancels the request and installs nothing. |
| NOTICE with a map JSON, package descriptor, archive or payload diagnostic | Input is actually incomplete, corrupt or unsafe, or cannot be reconstructed faithfully. Supported legacy layout alone is not an error. | The request stops; the original map and authored files are retained. |
| NOTICE naming a resource, policy or compilation failure | Required content is missing or inconsistent, edits conflict, or the engine cannot apply the required policy. | The attempted map provider is rolled back. A completed native fallback for unchanged game declarations is allowed. |
| NOTICE with an installation or filesystem failure | Staging, verification, publication or final commit fails, including disk, permission or source-change failures. | The entire attempted install is canceled; retry after resolving the cause. |
| NOTICE about an unfinished installation or previous map resources | An actual rollback or native resource retirement cannot finish. | Reuse stops to preserve existing data. A locked, already-retired temporary cache alone does not block another map. |
| NOTICE about native map continuation | The retained native request fails to resume or load. | That request and pending installation are canceled. |
| Map save failed … or package … could NOT be packed/embedded … | Required package usage cannot be established, source files changed or cannot be read, or the complete payload cannot be written. | The save is refused instead of publishing a map with missing content. |
| Play could not read the current map’s package requirements | The editor cannot serialize or prepare the map for Play. | Play does not start; the editor state remains available. |
The specific NOTICE text comes from the failed operation, so filenames and details vary. Ordinary cancellation, successful migration, complete resource coverage, a differently named bundle using already available resources, and vanilla-only maps should produce no package error notice. Map-authored resource values remain active for that map even when different local values are installed.
Combining packages
The compiler combines compatible changes from packages and built-in editor support against the original resource. For example, two packages adding different Blocking Box properties retain both additions and Snapmap+’s own navigation property. Identical contributions share an effective result while retaining every source owner. Authored duplicates remain in both package folders.
Editor properties keep their identity when moved between pages. One package can move a property to another page while another changes its description or adds different properties. For collections whose entries have known identities, the compiler also repairs counts and gaps in numbering and combines identical duplicate entries. These repairs affect the served output; your files stay intact. Fixed arrays and collections whose indices are referenced elsewhere keep their original indices.
Incompatible edits to the same value, contradictory collection ordering, or a deletion that conflicts with another edit produce a diagnostic naming the resource and packages. Folder order does not silently choose a winner. Binary models, images, compiled shaders and audio banks are served as whole payloads; concatenating them would corrupt their formats. No game archive is overwritten.
A malformed local package is skipped as one complete package. When otherwise valid packages
disagree over a field, the packages changing that field are skipped together; independent edits to
the same resource remain available. Structural conflicts that cannot identify individual field edits
skip the changing packages for that resource. Unrelated packages and built-in support remain available.
Conflicting package strings or HUD settings
exclude the incompatible package pairs. sh_packages shows the skipped folders and reasons.
Correcting the files allows those packages to return on the next refresh. Valid conflicting packages
still count as installed files when a map supplies its own valid authored policy, avoiding unnecessary
reinstallation. A map’s required packages must compile together before that map can load.
What a map carries
Saving selects packages automatically from gameplay resource use, including overrides of existing gameplay assets. Selected outer packages travel intact: assets, nested components, strings, requirements, editor helpers and auxiliary files. A mixed gameplay/editor package stays together. An editor-only tool does not select a package merely because the author used it.
Native Unknown, idTarget command, Timeline and Lift entities do not acquire a package dependency just because an editor tool exposed them. A map using only unchanged stock SnapMap resources has no package payload and remains vanilla compatible. Actual mod content requires Snapmap+ on the receiving client.
Grouping folders and nested components work with map delivery. There is no fixed package-count quota or the former small total-payload cap; available memory, storage and native format bounds still apply.
Playing a map with packages
Snapmap+ checks whether the client already has the map’s required resources. Package names, IDs, grouping and different local values do not by themselves require installation.
| What you have | What happens |
|---|---|
| All required resources | The map loads without an installation prompt. |
| Cyberdemon; the map carries another Cyberdemon grouping | No prompt when its required paths are already available. |
| Cyberdemon; the map also needs missing Hell Guard assets from Boss Demons | One prompt installs the whole Boss Demons package, including its duplicate Cyberdemon files. |
| The same package ID, but a required file is missing | The complete incoming variant installs beside your existing authored folder. |
| Different local values, such as 12,000 health instead of the map’s 10 | No prompt for that difference. The map uses its authored 10; your local source remains 12,000. |
| A missing required resource with no supplier | Loading reports the missing resource rather than silently substituting a default. |
Map-authored resources and policy govern both Play and Edit for that map. Leaving it restores your local library view. This applies across resource types, not only to demon health. Saving an incoming map retains its authored bundles even when no installation was needed; local files do not replace its author’s work. Installed packages can also be used in new maps and carried to the next player.
Accept the in-game prompt and Snapmap+ prepares complete packages, activates them and continues the requested load automatically. Installing or serving packages does not restart or reset DOOM. Declining cancels that pending mod-dependent load without installing anything; retrying can ask again. Interruption or activation failure cancels the entire new install group. Retry from the beginning; no partial package installation is kept for resuming.
Temporarily disabling your library
For troubleshooting, sh_user_overrides 0 saves a next-launch preference to disable user packages.
sh_user_overrides 1 restores that preference. This diagnostic switch requires a restart; normal
map-package installation does not. Built-in editor defaults and DOOM resources remain available.
Run sh_user_overrides without an argument to inspect the current and saved state. A failed save
does not guarantee a next-launch change. The startup log lists active overrides.
Advanced: Every Console Command
Everything above covers Snapmap+ through its window. Snapmap+ also adds a set of commands straight to
DOOM’s own console (press ~ to open it) — some are shortcuts for things the window already does,
others are console-only tools with no window equivalent. Run sh_help at any time to print the
full, current list with descriptions directly from the running build; the tables below are the same
list, organized by what each command is for. (Not repeated here: sh and its bulk-edit subcommands,
sh_target_any, and sh_rawmaps_on / sh_rawmaps_off — those are covered in their own
sections above.)
Inspecting entities and resources
| Command | What it does |
|---|---|
sh_spawn <entitydef> <name> |
Spawn an entity definition at your position and teleport to it. |
sh_dumpdef <entity name> |
Print — and copy to your clipboard — an existing entity’s resolved entity definition. |
sh_spawninfo |
Generate spawnOrientation / spawnPosition values from your current position in the map. |
sh_entlist |
List every editor entity type the engine knows about. |
sh_listres <resource class> [filter] |
List every resource of a given class (e.g. idMaterial), optionally filtered by name. |
sh_type <type or enum> [-v] |
Print the fields of an idTech class, or the values of an enum. Add -v to also see each field’s byte offset and size. |
sh_validclasses <inherit> |
List the engine-valid classnames for a given inherit — the same list that fills the Classname dropdown in the Entity State Panel. |
sh_dumpmap <name> |
Dump the currently generated .map (including SnapMap’s own auto-generated version) to a file, for debugging. Works in the SnapMap menu as well as in the editor. The name is game-relative, not a Windows path: a bare name lands in <game dir>\base\mapdumps\<name>.map, and the .map extension is always forced. Dumping the same name twice never overwrites — repeats become <name>_2.map, <name>_3.map, and so on. Pass a name containing a / (e.g. arena/pass1) to choose your own subfolder under base\; it is created for you. The command prints the full path it wrote. |
Rawmaps
| Command | What it does |
|---|---|
sh_rawmaps |
Show the rawmap state, the Load Path and the Save Path. sh_rawmaps help lists every verb: list, on/off, load, save, savepath, default and overwrite. See Rawmaps. |
Compiling assets
| Command | What it does |
|---|---|
sh_genbmodel <input> <output> |
Generate a bmodel from a .obj, .ase, or .lwo file. |
sh_genmd6model <input> <output> |
Compile a .md6model into a bmd6model. |
Player cheats
Five toggles for your own player, mainly useful while testing a map solo:
| Command | What it does |
|---|---|
noClip |
No-collision flight. |
infiniteHealth |
You can’t lose health. |
noPlayerDeath |
You can’t die. |
noPlayerKill |
You can’t be killed outright. |
noTarget |
Enemies ignore you. |
Override controls
| Command | What it does |
|---|---|
sh_packages |
Lists installed packages, compiler results and every skipped package with its reason. sh_packages dependencies [type name] inspects observed native dependencies. |
sh_user_overrides [0\|1] |
On a successful save, controls whether player override files load on the next DOOM launch. 0 disables and 1 enables only the first resource layer; restart DOOM to apply either value. A failed save is reported and leaves this launch unchanged, with no next-launch change guaranteed. With no argument, reports this launch’s state plus either the saved next-launch state or a volatile value not confirmed saved. |
Cvars
Settings you read or change with <name> or <name> <value> in the console:
| Cvar | Default | What it does |
|---|---|---|
sh_pretty_on |
0 |
Type sh_pretty_on 1 to turn on, sh_pretty_on 0 to turn off. On, it pretty-prints every rawmap Snapmap+ saves: Save Rawmap, Save Rawmap As…, sh_rawmaps save, and DOOM’s own Save while Use Rawmaps for Every Save/Load is on. At 0, rawmaps are compact JSON. |
sh_copy_reslist_to_clipboard |
0 |
Copy sh_listres output to the clipboard automatically. |
Developer and diagnostic tools
The rest exist mainly for Snapmap+’s own developers to debug the engine hooks — you’re unlikely to need
them, but they’re listed here for completeness since sh_help shows them too:
| Command | What it does |
|---|---|
sh_navmesh |
Show the baked AI navigation the current map uses: which modules and nav classes, or why a bake was refused. See AI navigation on Blocking Boxes. |
sh_navmesh marks [count] |
Mark navigation boxes red in the preview, the same way a refused bake marks them. It marks up to count boxes in each module (default 4, maximum 24). sh_navmesh marks 0 clears the marks. |
sh_perf |
Show where Snapmap+ spends frame time, such as reading the map and building navigation previews. sh_perf reset sets the counters to zero. sh_perf read times two ways to read the open map: the whole map at once, and each entity one at a time. It also estimates the cost to read only the navigation boxes. Run it with a map open in the editor. |
sh_alginfo |
Report the status of Snapmap+’s optional math-acceleration layer. |
sh_debugrender |
Renderer debug toggle; sh_debugrender dumprenderinfo prints how many rendermodels are active, then names them. |
cs_dontuse |
Toggle higher-precision engine-math overrides — a performance tradeoff, off by default; the name is the warning. |
sh_superscriptop |
Dump SuperScript / eventDef data. |
cs_dumpeventdefs |
Dump every eventDef to a file. |
cs_fieldinfo |
Print field info for a type. |
cs_start_render_logging |
Set up the render-logging hook. |
sh_disable_devmode / sh_reenable_devmode |
Turn DOOM’s developer features off, or back on, without losing your Bethesda.net connection. |
sh_dialogtest [id] [buttons] [text] |
Raise DOOM’s own modal dialog carrying the given text — the same surface behind the mod-package install prompt. |
sh_dialogpoll |
Read the answer to the dialog sh_dialogtest raised. |
sh_dialogdump |
Print the engine’s dialog queue: id, button set, and flag bytes. |
Reporting Bugs and Requesting Features
Snapmap+ has a built-in way to send feedback straight to the developers — no GitHub account, no email, no leaving the game. Click the small ? button in the bottom-right corner of the status bar to open the Send feedback dialog.
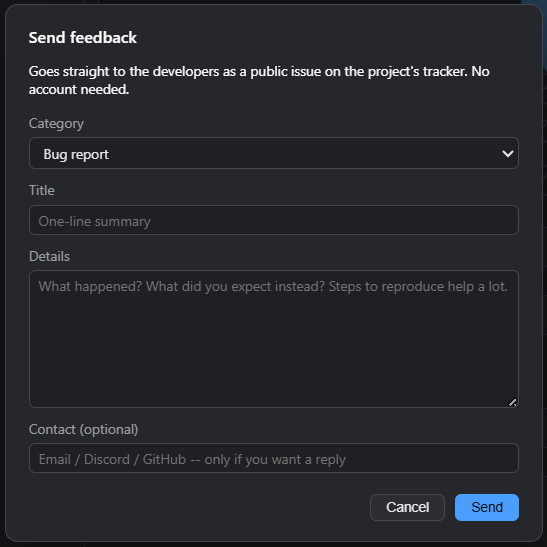
Fill in:
- Category — Bug report, Feature request, Incorrect description / info (something in this guide or the app’s own text is wrong), or Other.
- Title — a one-line summary.
- Details — what happened, what you expected instead, and steps to reproduce if it’s a bug. The more specific, the more useful.
- Contact (optional) — an email, Discord handle, or GitHub username, only if you want a reply.
Click Send and it’s filed as a public issue on the project’s tracker under the category you picked. If someone’s already reported the same thing, Snapmap+ recognizes the duplicate and adds your report as a note on the existing issue instead of creating a new one.
The same reporting pipeline also backs Snapmap+’s crash report dialog: if the game hits a serious
fault, a crash dialog opens (right away if Snapmap+ recovered in place, or on your next launch otherwise)
with the error, an optional description of what you were doing, and a checkbox to attach recent log text
(anonymized — your Windows account and machine name are stripped before anything is sent). Sending it
files a crash-labeled issue the same way, and repeat crashes at the same spot get grouped onto one
issue rather than filing duplicates.
Nothing is sent unless you click Send — Snapmap+ makes no other network requests on its own.